

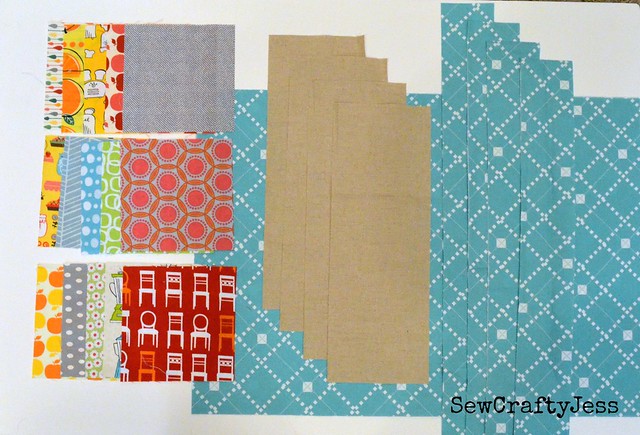
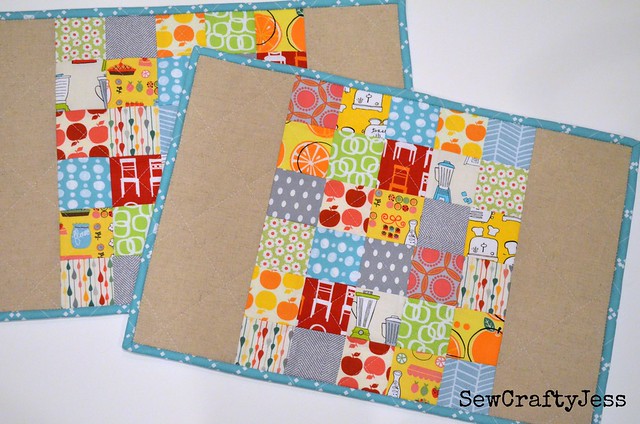
Hello and welcome to my stop on the Charm Madness Blog Hop hosted by the lovely ladies of Sew Lux Fabrics! Today I have an easy peasy placemat tutorial that you can quickly transform a few charms into. Today's project will use a total of 15 charms, which can be from a charm pack, or like I did, fabrics that are simply cut into 5 inch squares. I'm using up a couple charms I've received as part of a few charm swaps in the past. Without further ado, lets get stitching!


Tuesday 3/19 - Jennie at Clover & Violet
Wednesday, 3/20 - Jess at Sew Crafty Jess
Thursday, 3/21 - Rhonda at Quilter in the Gap
Friday, 3/22 - Jenelle at Echinops &Aster
Wednesday, 3/27 - Kelsey at Kelsey Sews
Thursday, 3/28 - Lindsay at CraftBuds/
Friday - 3/29 - Jennifer at That Girl, ThatQuilt
Saturday, 3/30 - Stacey at The Tilted Quilt
Tuesday, 4/2 - Wendi at prsd4tim2
Wednesday, 4/3 - Elizabeth at Don't Call Me Betsy
Thursday, 4/4 - Ginny at Fish Creek Studio
Saturday, 4/6 - Leona at Leona's Quilting Adventure
Sunday, 4/7 - Week 3 Giveaway Post
Sunday, 4/7 - Week 3 Giveaway Post
Three Ways to Win Prizes
- Enter the three weekly giveaway drawings on Sundays during the blog hop over at the Sew Lux blog.
- Link up your own charm project - Linky post will be open for entries between 3/23 – 4/6.
- Enter the Grand Prize Winner Giveaway by counting the total number of charms used in all the blog hop tutorials. Complete the entry form on 4/7 or 4/8.
All entry posts for prizes will be on the Sew Lux blog.
Thanks for the great tutorial.
ReplyDeleteSuch a lovely project, these would be perfect for kids if you used i-spy charms.
ReplyDeleteWhat a great project! Thanks for sharing your tutorial.
ReplyDeleteSo cute!!
ReplyDeleteThese are just beautiful - nicely done!
ReplyDeleteThese are SO cute! :)
ReplyDeleteCute! I want to make my kids their own placemats when they get a little older, I will have to try this!
ReplyDeleteCute - nice!!
ReplyDeleteThese are just darling!
ReplyDeleteSo cute!
ReplyDeleteAw, love it! Especially the blue binding - very striking.
ReplyDeleteThose are beautiful!!!
ReplyDeleteThanks for the great tut. I love the linen and the brown color; made that patchwork take center stage.
ReplyDeleteLove this tutorial Jess - the placemats are beautiful!
ReplyDeleteGreat tutorial. The choice of charms would really determine the mood of the placemats.
ReplyDeletewhat a great idea. thanks for sharing your tutorial.
ReplyDeleteThese are rockin placemats! Thank you for a great tutorial, this is a super pattern. It would be so easy to customize a placemat for each child/person. Thank you for sharing your placemats with us, beautiful job!
ReplyDeleteusairdoll(at)gmail(dot)com
Too cute placemat. You could easily set your table for each Season with different charm packs. Love this idea. Thank you. (Maybe I'll do a fun stitch or applique in the end side of each placemat.)
ReplyDeleteThese are really striking - I love them!
ReplyDeletegreat tutorial - these are on my list - thanks!
ReplyDeleteLove your placemats. I'm always looking for an easy gift. These are great! Thanks!
ReplyDeleteTotally in love with these
ReplyDeletelove all your quilts and projects
ReplyDelete