Showing posts with label tutorial. Show all posts

Friday, March 20, 2015

Travel Diaper Clutch Tutorial


****Looking for the Sew Pretty for Little Girls e-book giveaway?  Click here!****

****This giveaway is now over****

********************************************

As promised, I'm back with a tutorial for the super simple travel diaper clutch I shared last week!  This really is so easy to make, and comes together well within an hour.  Go ahead, make one for your self, and then one for all of your friends, as everyone should be carrying diapers in style.  See below for the tutorial, or download the PDF version for easy printing.  If you make one, I'd love to see it!  Tag me on Instagram @sewcraftyjess, or add it to the SewCraftyJess Flickr group!

16700203125_bb9afaa4c0_o

Travel Diaper Clutch
PDF Version
Folded Finished Size: 6.5" x 10.5"

You will need:
Outer fabric: 22" x 10.5"
Lining fabric: 22" x 10.5"
Binding fabric: (2) 11" x 2.5", (2) 13.5" x 2.5"
Sew-on Velcro 2" x 1/2"" 
Fusible fleece*: 22" x 10.5"
Iron-On Vinyl*: (2) 22" x 10.5"
*Optional-fusible fleece is highly recommended if using quilting cotton weight fabric

Instructions
1.  Apply fusible fleece to wrong side of outer fabric

2.  Following package instructions, apply iron vinyl to right sides of both outer fabric and lining fabric.

DSC_0925

3.  Layer outer fabric and lining fabric wrong sides together and pin.  Baste layers together using 1/8" seam allowance.  Note:  If using iron-on vinyl, keep your pins within 1/4" of the fabric edge so the pin marks are hidden within the seam allowances of the finished product.  

DSC_0926

4.  Center velcro 2" in from each 10.5" edge of the outer fabric (below picture shows 3", pretend it shows 2"), and sew in place.

DSC_0927

5.  Take the (2) 11" x 2.5" binding strips, fold in half lengthwise, press.  

DSC_0928

6.  We will attach (1) binding strip to each 10.5" edge in the same manner as applying quilt binding.  Align the raw edges of the binding with the outer fabric raw edge of the 10.5" side, sew with 1/4" seam allowance.

DSC_0930

7.  Fold the finished edge around to the back of the fabric (lining fabric side).  Stitch in the ditch from the outer fabric side, catching the finished edge of the binding on the lining side of the fabric sandwich.

DSC_0931

8.  Fold each 10.5" edge in towards the center, creating (2) pockets that measure 4.5" x 10.5".  Baste in place following basting stitches from step 3.

DSC_0932

9.  Fold short edges of remaining (2) binding strips 1/4", press.  

DSC_0935

10.  Fold in half lengthwise, as in step 5.  

11.  Apply binding strip to each unfinished edge as in steps 6 and 7.  I prefer to begin applying binding to the "outer fabric" of the pouch, and fold binding around to the inner "pocket side".  

DSC_0937

12.  Fill your new stylish diaper clutch full of diapers and wipes, enjoy!

Diaper Clutch


Monday, February 9, 2015

Giveaway & Be Mine Valentine Bunting

****This giveaway is now closed****

DSC_0845

Happy Monday!  I had the pleasure of working with the folks at Benartex to put together a new version of my Be Mine Valentine Garland Tutorial!  Head over to the Benartex blog Sew in Love {with Fabric} to check out the tutorial. 

DSC_0841

While you are over there, be sure to follow Sew in Love {with Fabric}either by reader or email or pop over to follow Benartex on Facebook.  The lovely folks of Benartex have graciously offered a fat quarter bundle of Love is All Around (fabric used to make this bunting--the X's and O's are my favorite!) to one lucky SewCraftyJess reader!  Simply leave a comment below telling me you now follow the Benartex blog or Facebook page.

DSC_0847

Giveaway will be open until Friday, February 13, 2015 at 9:00 AM.  US residents only.  ***Giveaway now closed***

Thursday, November 20, 2014

Super Simple Non-Serger Burp Cloth Tutorial

Untitled

Welcome baby Jordan to the world!  No I haven't been holding out on you, he's not actually mine, but he's my very first nephew and godson, so he's pretty close to mine!  I don't think my sister-in-law would mind.  Ok maybe she would, but I fully plan on getting as many newborn snuggles as I can from this little guy!

Nora hasn't yet met her new cousin, but will in the next few days, I'm definitely a little nervous, as Jordan isn't quite durable enough to stand up to how Nora "plays" with her friends.  Daycare told me the one day that she was "using the other children as drums" during play time.  I guess I'll take peace in knowing she can stand up for herself.  

Anyways there is a quilty point to this post (not that sharing newborn tiny adorable-ness isn't a perfectly good reason to post), but I realized I never shared my absolute favorite burp cloths with you!

DSC_0226

When I was pregnant with Nora, burp cloths were one thing I was bound and determined to make oodles of.  From what I had heard you couldn't have enough (true story, you can't), and the ones available in the store just looked puny.  I made a few versions.  I made a flannel/chennile version using Made's tutorial, and while these were good and quite absorbent, they weren't quite big enough for what I really wanted, and ended up running a little on the pricier side to get the chenille that I could not find locally.  I also made a few using cloth diapers and sewed on some pretty accent fabric like these I made way back in the day.  These were nice, and while the quilting cotton sure made them look pretty, they weren't the most absorbent burp clothes I'd ever used.

DSC_0233

Enter one of my super sweet patients who in talking during one of her appointments, discovered we both shared a love of sewing and quilting!  She brought me the nicest baby gift just before Nora was born, and included was a huge stack of hand made burp cloths.  She said these were all of her grown children's favorites for their kids, so when I anxiously asked what she used and how she made them, she told me she used two pieces of flannel, wrong sides together and serged those puppies into THE BEST burp cloth I have ever used.

DSC_0238

Seriously now.  These ended up being the best burp clothes we used while Nora was in her prime spit up stage.  Even my husband would ask for "the good burp clothes" when he fed her, and they are so. simple. to make.

DSC_0225

Now, if you have a serger there isn't much of a tutorial, as the steps are: 1. (2) pieces of pre-washed flannel approximately 11" x 17" (this will give you 4 nice sized burp clothes from 1 yard of fabric) 2. align WRONG sides together. 3.  Serge edges.  and DONE!

Now if you are like me, and don't have a serger, follow the super simple tutorial, which is almost just as simple as actually using a serger, but uses a sewing machine instead.

15758992231_a0d45db180_z

You will need:  
(2) pieces PRE-WASHED flannel appx 11 x 17 (I found this to be about the biggest size to get me 4 complete burp clothes from a PRE-WASHED 1 yard piece of flannel)
Sewing Machine
Edging Foot

DSC_0096

1.  Align 2 pieces of flannel WRONG sides together.  I like to press both pieces together to make sure they are as smooth and flat as possible.  Pin generously to avoid shifting while sewing.

15250322426_cd52e93de1_z

2.  Find your edging foot for your sewing machine.  I sew on a Husqvarna Viking Sapphire 835 and mine is a foot "J".  basically this foot looks like a fairly normal foot, only has a small bar, where the arrow in the above picture is pointing.  You will use this to line up the edge of your fabric, so the feed dogs don't "eat" the edges.

DSC_0100

3. Attach your foot, align fabric edge with metal bar and select a zig zag stitch.  I like about 5mm width and 4-5 mm spacing.  This is what the reading on my machine looks like:

DSC_0099

4.  You will notice that the needle will sew over that bar and form an encased edge, similar to how a serger works.  Sew around all 4 edges, backstitching at the start and stop point, and that's it!  You are now in possession of one of the best burp clothes, that  took less than 5 minutes to make!


DSC_0236

I was a little worried about how the edges would hold up to multiple washings, as the edges aren't totally encased like when serging, but I have been pleasantly surprised so far!  The above picture is how the edges look after 3 washings.  Not too shabby!

Now go make lots of these for all your friends and family members (and yourself!) because they will LOVE these!


Tuesday, September 2, 2014

Tutorial: iPad Sleeve

Hi all!  I hope everyone had a relaxing labor day weekend.  We spent Saturday enjoying my parents pool for what was likely the last time this year.  Nora is most definitely a water baby, the girl loves to splash and play, and would spend hours in the bathtub/pool if we let her!  Hopefully she remembers her love of the water next summer also.

DSC_0073

Anyways, as promised, I'm back with a tutorial for my iPad sleeve I shared a few weeks ago.  This is seriously the quickest and easiest sew I've made in a while.  It is definitely a "1 nap" sew (because nowadays that's how I measure time), and that's with taking time to take pictures for the tutorial included!  Without further ado, here she is!

DSC_0070edit

iPad Sleeve Tutorial
(designed to fit the iPad Air, or any tablet measuring approximately 10" x 7", and appx 1/2" thin)
downloadable PDF version of this tutorial available here

You will need:

(1) 11.75" x 21" home decor weight fabric* (outer fabric)
(1) 11.75" x 19" home decor weight fabric* (outer fabric)
(1) 11.75" x 21" flannel or quilting weight cotton (lining)
(1) appx 11 x 20.5" Stiff sew in interfacing
2" x 6" sew in velcro

* I chose to use home decor weight fabric and did not use any sort of fusible interfacing.  If choosing quilting weight cotton, I would recommend using a lightweight fusible interfacing to the wrong side of your outer fabrics.

Tip:  Use a heavy duty denim or jeans needle, as you will be sewing together multiple thick layers.  It also may be advisable to use your walking foot if you have one.  

Use a 1/4" seam allowance, unless otherwise noted.

1.  Sew pocket outer fabric and lining fabric right sides together (RST) along (1) 11.75" edge.  Press towards lining and topstitch.

DSC_0047

2.  Sew 2" x 6" "sticky" side of velcro 1" down from finished edge of pocket, centered on outer fabric.

DSC_0048

3.  Layer: Outer lining fabric-right side facing up, pocket with outer fabric and velcro facing down, and outer main fabric right side down.  Sew along all 4 edges leaving appx. 6" gap for turning along the short edge with only the outer and lining fabric.

DSC_0049edit

4.  Turn right sides out through opening left in step 3, keeping the pocket towards the main outer fabric.  Press.

 DSC_0050

5.  Measure size of pressed exterior fabric when flat.  Cut piece of stiff interfacing appx 1/4" - 1/2" smaller than dimensions measured.  Insert through opening left in step 3.  Center and align so interfacing lies flat between outer fabric and lining fabric.  

DSC_0051

6.  Top stitch short edge with opening closed, catching the interfacing while stitching.

DSC_0060

7.  Top stitch 6.5" down from edge with pocket and velcro.  The stitch line should be appx. 1.5"-1.75" below velcro.

DSC_0061edit

8.  Fold lining sides together along stitch line from step 8.  Sew with a generous 1/4" seam allowance along each side edge to form an envelope.

DSC_0062

9.  Sew other half of velcro along top flap of envelope centered appx. 1/2" from top edge.

DSC_0063

10.  Stand back and admire your new iPad sleeve!  (And smile at how quickly it came together!)

DSC_0068

DSC_0071

Don't forget, you can get the downloadable PDF version of this tutorial here!

If you make an iPad sleeve, I would love to see it!  Be  sure to add it to the SewCraftyJess Flickr group


Tuesday, February 18, 2014

plus quilt tutorial

I've had a few questions about the pattern I used to make my plus quilt top I shared last week, and while the design idea is certainly not unique to my quilt, I didn't follow a pattern per se, but did my own quilty math for the plus size dimensions I wanted.  In case you'd like to make your own baby/lap sized plus quilt, I thought I'd share a quick tutorial with cutting and assembly instructions.

DSC_0447

This quilt top will finish at 50" square, making a generous baby quilt or lap sized throw.  I chose to keep the rectangular centers of each plus as one piece, versus the entire quilt being comprised of only squares.

Plus Quilt Tutorial

Please read instructions in full before beginning.

Fabric Requirements
(12) Fat Quarters measuring no less than 18" x 22"
3 yards backing fabric
1/2 yard fabric for binding

Cutting Instructions
From each of (12) fat quarters:
  • Cut (5) 3" x 18" strips
    • Subcut (3) of the 3" x 18" strips into (2) 8" x 3" strips
      • You will need all (72) 8" x 3" strips
    • Subcut (2) of the 3" x 18" strips into (6) 3" x 3" squares
      • You will need all (144) 3" x 3" squares
Choose (8) of the remaining 7" x 18" pieces of fabric:
  • Cut (1) 3" x 18" strip
    • Subcut 3" x 18" strip into (1) 5.5" x 3" strip and (3) 3" x 3" squares
      • You will need all (8) 5.5" x 3" strips
      • You will need all (24) 3" x 3" squares
Assembly Instructions
Once your fabric is cut, you can begin laying out your quilt top.  The majority of your quilt top will consist of whole pluses consisting of (1) 8" x 3" strip and (2) 3" x 3" squares.  There are also variations which are included along the edges of the quilt.  Please see below for a breakdown totaling the number of each plus variation.

Untitled

65 total 
Consists of (1) 8" x 3" strip and (2) 3" x 3" squares


Untitled

7 total
Consists of (1) 8" x 3" strip and (1) 3" x 3" square

Untitled

      7 total
      Consists of (1) 5.5" x 3" strip and (2) 3" x 3" squares


Untitled
   
      1 total
     Consists of (1) 5.5" strip and 1" 3" x 3" square


single 3" square:  16 total

DSC_0448

Use the above photo to help layout your quilt top.  Once you are happy with the layout, begin sewing each row together, taking care to keep all strips and squares in the  correct position.  I find it helpful to sew one complete row and place it back on my design wall to keep things from getting out of place.  If you do not have a design wall or somewhere to keep things laid out for a few days while assembling, use post its to number each row to help keep things in order.

Hope this tutorial was helpful!  If you make a plus quilt using this tutorial, I'd love to see it in the SewCraftyJess flickr group!

Monday, July 22, 2013

Block Tutorial: Hexagon Star Paper Piecing Templates

Happy Monday everyone!  I am finally posting the tutorial for my Hexagon Star block I designed for the last round of the 4x5 bee!  Only 3 months later, but who's counting.  I hate to admit, but my sewing machine has been completely neglected this past week, she's probably suffering from some sort of abandonment issues, but for good reason, I think I'm in full on nesting mode!  

I'm finding closets to organize and things inside them I didn't even know we had!  Last weekend we did a major purge via the neighborhood yard sale which felt great, and lately I think the drop off boys at Goodwill are getting to know me by name.  While unfortunately these things are eating up my sewing time, it does feel nice to be making room for baby (and organizing the heck out of our house in the meantime!).  This past weekend was spent painting the nursery, and I'm itching to get decorating in there! 

Anyways, onto what this post is really about, a free block tutorial for this glorious Monday! 

Hexagon star block

As was the same with my Wonky House paper piecing tutorial, I don't have step by step piecing instructions for this block included in this post.  If you are new to paper piecing, or need a refresher, there are so many awesome tutorials out in blogger-land, like my favorite from Faith of Fresh Lemon's Quilts, her paper piecing tutorial can be found here.

The Hexagon Star Paper Piecing Block templates can be found here.  Block size is 12.5" unfinished, or 12" finished.  Please be sure to download the templates to your computer before printing, as I've found the block sizing to be off when printing directly from Google Documents.  Also be sure to set your page scaling to "none" or select "Actual Size" from the page scaling options.

hexagon star block 2

This block comes together quite easily, each template is labeled with a section "letter" and then the order to piece each section is indicated with a number.  Once your (6) sections are pieced and trimmed, piece sections A, B and C together, and then piece sections D, E and F together, using the above picture for reference.  Press seams open.  Lastly sew the two block halves together to form (1) 12.5" unfinished block.

If you happen to make a Hexagon Star block, I'd love to see your version in the SewCraftyJess Flickr Group!

I am itching to get back behind my machine, and show Bertha a little love, so hopefully this week I will dig out some time, in between closets I've found to organize (I'm looking at you, linen closet...) and stitch up something pretty with these amazing AMH voiles I picked up from amanda at Westwood Acres.  I'm thinking of some super simple patchwork, can't ever have enough!!

Monday, June 10, 2013

Wonky House Tutorial and EQ7 Review

Hive 4 January

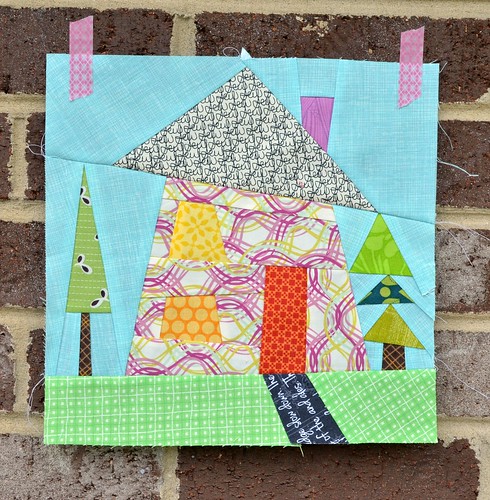
After much fiddling with my new EQ7 software, I finally have templates for my Wonky House block that are ready to share and download! You may remember this block from my massive Stash Bee block catch up from last month.  Pauline requested wonky houses for her month back in February and I definitely hesitated as I've mentioned before that I don't do wonky very well.  A lightbulb went off and I thought to design a paper piecing "wonky" pattern with EQ7.  This way I could have my cake and eat it too...the block would be perfectly wonky...with the bonus of crisp template lines to follow along with.

I'm not going to share a tutorial for paper piecing in general, as there are several awesome ones out there in blog land, and why reinvent the wheel.  If you have never paper pieced before, or need a refresher, check out Faith of Fresh Lemon's Quilts Paper Piecing Tutorial her's is my favorite!

The Wonky House Paper Piecing Templates can be found here. Block size is 12.5" unfinished, or 12" finished.  Please download the file to your computer before printing the templates, as I've found the block sizing to be off when printing directly from Google documents.

Untitled Drawing 43

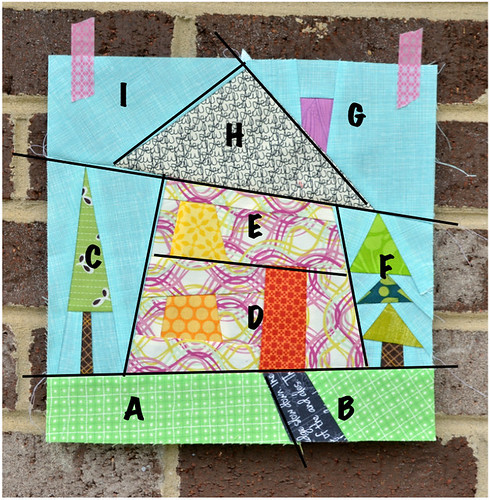
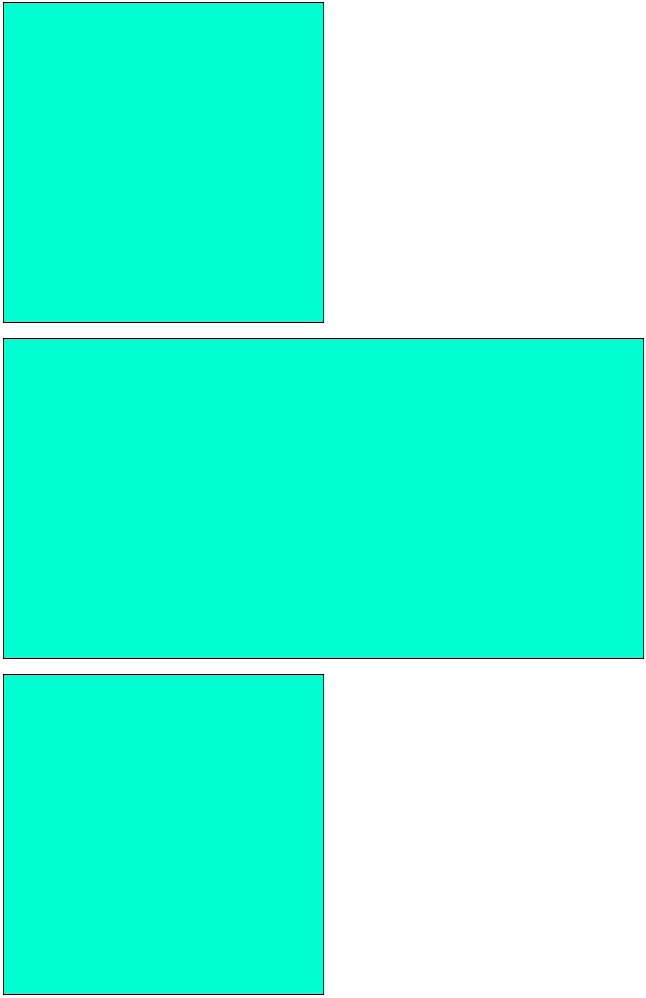
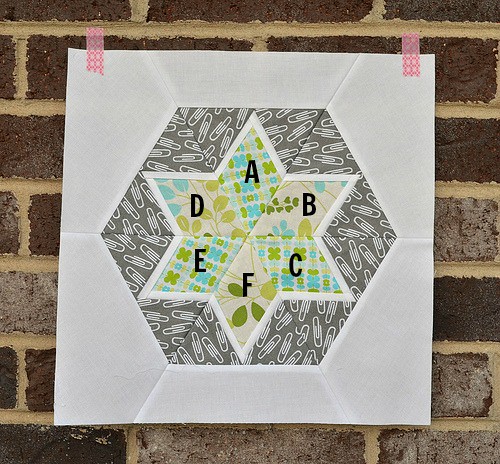
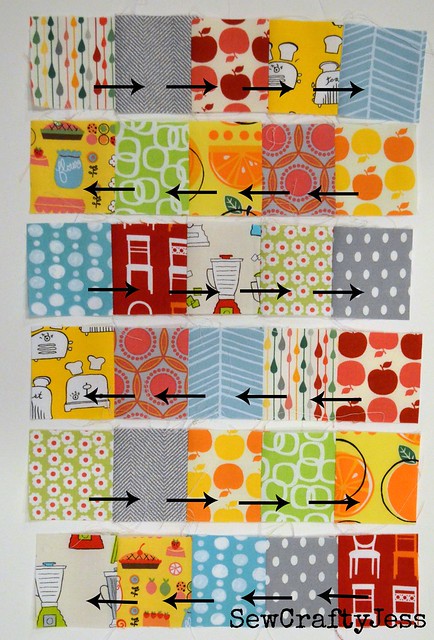
Cut out all template pieces and paper piece using the numbered sections on each template.  Once all your sections are pieced, use the above diagram to assemble your block.  Please note sections A, H and I are single fabric sections.  Due to the size constrictions of fitting the template pieces onto standard 8.5" x 11" paper for printing, this was the only option.

Also, please note that the above finished block is a mirror image (read: backward) of the template pieces.

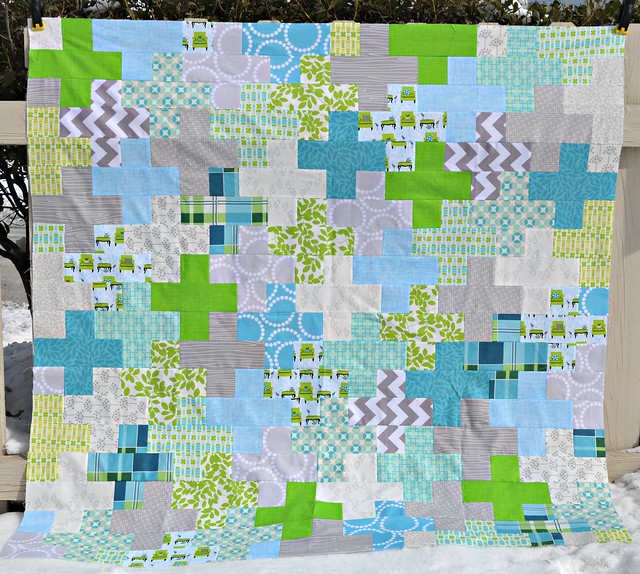
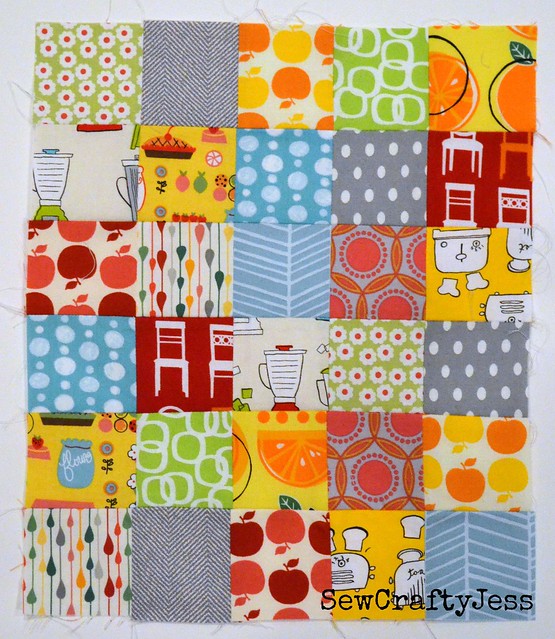
Once your block is pieced, admire your work!  Also be sure to add it to the SewCraftyJess Flickr group, as I'd love to see your interpretation!

If you are interested in the ramblings of my EQ7 experiences so far, check out the review below:

I had been in the market for quilt design software for some time now, and had deliberated between several options.  I have used the TouchDraw app for my iPad thus far for quilt patterns and tutorial illustrations, which has worked great, but I really wanted something to help design paper piecing templates.  I checked out jumping in with Adobe Illustrator, but ultimately thought that might be a little more than I really needed (and pricier too!), as well as checked out a few online quilt design options including Thread Bias' Quilt Design Tool, but decided that I wanted something that would be downloaded to my computer and not require a monthly subscription fee.  After ruling out these options, I settled on Electric Quilt's EQ7.

After receiving my software in the mail (I ordered from Fat Quarter Shop) I spent quite a bit of time reviewing the users manual for EQ7, learning the ins and outs of the software, as well as watching the demo videos and tips that are built right into the software.

I also purchased the book EQ With Me: Pieced Drawing, as I was still a little unsure of the best way to use the software to design blocks that I had in mind.  I can't say enough good things about this book.  It takes each of the modes available in the EQ7 software and teaches you how to use them via a multitude of step by step tutorials (lessons) detailing how to construct various blocks of assorted difficulty.  If I had known about this book from the beginning, I would have skipped the users manual and dove right into the lessons, as I'm a hands-on learner.

So far, there hasn't been a quilt block I've come up with that EQ7 couldn't design, or a quilt layout that didn't easily come together.  I'm also a huge fan of the ability to import fabric swatches to get an actual image of what a quilt will look like with certain fabrics.

As for the cons, my main dislike is the lack of instruction within the software and users manual itself for using each function to actually construct quilt blocks.  Maybe its just me, but I find its one thing to understand how a tool works and another to apply that tool in a string of 9 other tools to make a finished product.  Now as mentioned before, the EQ With Me book completely did this for me, but after spending all that money on the software, its understandable to not want to spend another $30 on a book to learn how to use the software.

One of the main reasons I wanted this software was to design paper piecing templates not only for myself, but to share with all you lovely readers.  While EQ7 makes the designing aspect of this incredibly easy (once getting the hang of things), it doesn't make the sharing part easy at all.  I found (and confirmed) that there is no way to save the resulting pages of paper piecing templates as an image document or PDF in the software.  While this is no big deal if only making templates for yourself, but it poses a huge problem if planning on sharing the templates as a download with others.

  There is a way around this, I used Shape Moth's suggestion of installing a free PDF creator (I downloaded this one for free and it works like a charm) that lists itself among your printer options, so instead of printing the final copy of paper piecing templates via a printer, you can "print" them by selecting the PDF creator from the drop down printer selector which then results in PDF pages to save to your computer that are ready to download, instead of printed pages.

Let me make myself clear, most of my gripes I have have nothing to do with the actual function of how the software works to design quilts and quilt blocks, but instead are with the little extras that would help with the finishing stages of publishing and sharing paper piecing templates.  Perhaps this is where I should have considered Adobe Illustrator (and its heftier price tag) for publishing purposes, but in case you perhaps are considering EQ7 for the same reasons, I thought I'd share my experiences.

On the whole, I can't say enough good things about this software and its ease of use, and only a minuscule amount of gripes, which for the most part I have been able to navigate around.  I definitely give it a two thumbs up, which if I had to purchase again, would do so in a heartbeat!  Disclaimer:  I have not been paid in any way for this review.  It is simply an unbiased review of my thoughts and impressions to share with others who may be in the market for quilt design software.


Wednesday, March 20, 2013

Charm Madness Blog Hop: Patchwork Placemat Tutorial

Charm Madness at Sew Lux Fabric

Hello and welcome to my stop on the Charm Madness Blog Hop hosted by the lovely ladies of Sew Lux Fabrics!  Today I have an easy peasy placemat tutorial that you can quickly transform a few charms into.  Today's project will use a total of 15 charms, which can be from a charm pack, or like I did, fabrics that are simply cut into 5 inch squares.  I'm using up a couple charms I've received as part of a few charm swaps in the past.  Without further ado, lets get stitching!

Charm Madness Patchwork Placemat Tutorial 2

For today's tutorial here's what you'll need:

(15) assorted 5" charm squares
(4) 4.5" x 12.5" background fabric (I used linen)
(2) 14.5" x 20.5" (for placemat backing)
(4) 2.5" x 42" (WOF) (for binding)
(2) 14.5" x 20.5" batting

step 1

Instructions:

use 1/4" seam allowance, unless otherwise noted

1.  Take each of your (15) charm squares and cut each into (4) 2.5" squares.  You will have (60) 2.5" squares.

step2

2.  Of the (60) 2.5" squares, choose (30) per placemat.  Arrange one set of (30) 2.5" squares into a grid of 6 rows and 5 columns.  This will make the center patchwork portion of our placemat.

step 3

3.  Sew together each row of 2.5" squares.  Press rows 1, 3, 5 seam to the right.  Press rows 2, 4, 6 seam to the left.  This will allow the seams to nest nicely when sewing the rows together.

step 4

4.  Sew all 6 rows together, nesting the seams together for a nice crisp seam intersection.  Press row seams open to reduce bulk.

step 5

5.  Next, take (2) of your 4.5" x 12.5" background fabrics and sew along the 12.5" edges to the center patchwork portion.  Press seams toward the background fabric.

step 6

6.  Repeat steps 1-6 with your remaining materials to make the second placemat.

7.  Baste, quilt and bind as desired.  You will need (2) 2.5" x WOF binding strips for each placemat.

step7

Be sure to check in here for details about the Linky party, giveaways and prizes!  Be sure to check out the rest of the stops on the blog hop for lots of charm inspiration!

Tuesday 3/19 - Jennie at Clover & Violet
Wednesday, 3/20 - Jess at Sew Crafty Jess
Thursday, 3/21 - Rhonda at Quilter in the Gap
Friday, 3/22 - Jenelle at Echinops &Aster
Sunday, 3/24 - Week 1 Giveaway Post

Tuesday, 3/26 - Lori at Lori H Designs
Wednesday, 3/27 - Kelsey at Kelsey Sews
Thursday, 3/28 - Lindsay at CraftBuds/LindsaySews
Friday - 3/29 - Jennifer at That Girl, ThatQuilt
Saturday, 3/30 - Stacey at The Tilted Quilt
Sunday, 3/31 - Week 2 Giveaway Post

Monday, 4/1 - Alyce at Blossom Heart Quilts 
Tuesday, 4/2 - Wendi at prsd4tim2
Wednesday, 4/3 - Elizabeth at Don't Call Me Betsy
Thursday, 4/4 - Ginny at Fish Creek Studio
Saturday, 4/6 - Leona at Leona's Quilting Adventure
Sunday, 4/7 - Week 3 Giveaway Post


Three Ways to Win Prizes

  • Enter the three weekly giveaway drawings on Sundays during the blog hop over at the Sew Lux blog.
  • Link up your own charm project -  Linky post will be open for entries between 3/23 – 4/6.
  • Enter the Grand Prize Winner Giveaway by counting the total number of charms used in all the blog hop tutorials.  Complete the entry form on 4/7 or 4/8.
All entry posts for prizes will be on the Sew Lux blog.