Friday, June 29, 2012

June Bee Blocks

Nothing like waiting until the last possible second of June to finish up my bee blocks, but I squeezed them in just in time.

for Amanda-do. Good Stitches Imagine circle- June

One of the reasons for the delay were these little guys.  For June in our do. Good Stitches circle, Amanda asked for Improv Chevron blocks using the tutorial from Six White Horses.  Now the tutorial is great, but improv piecing is just not my thing (hence putting these blocks off till the last nano second).  I think I almost get a sort of anxiety, I'm so worried that it won't work out, that I do not end up enjoying the process.  At all.  

As I was stressing over working on these blocks, a lightbulb went off, and I got the idea to try paper piecing these.  Since Amanda wanted 12.5" blocks, I figured 12" scrapbook paper would work perfectly.

"Improv" Chevrons #1

First I drew my vertical lines where I wanted the 3 chevrons to be laid out.

"Improv" Chevrons #2

Then I began drawing in my chevrons.  I added a little wonkiness to mine.

Untitled

Once I filled in all three sections, I labeled my sections with a L, R and C for left right and center, and then cut the pieces apart along the 3 vertical lines.  I began paper piecing at the "triangle" end of the chevron and worked upwards.  After I filled in all three chevrons, I then trimmed my 3 sections, and left a generous 1/4" inseam on all four sides of each piece, and then pieced the three sections together.

for Amanda-do. Good Stitches Imagine circle- June

Voila!  "improv" chevrons!  Now this way certainly does not save any time, but if you are like me, and are a big scared-y cat of improv piecing like this, it saved me a lot of anxiety, and probably from uttering quite a few curse words as well.

After getting through those two blocks, the next two, for Mandy in the Stash Bee, we were to make two Friendship hexagon blocks using Elizabeth's tutorial.

Stash Bee- June Hive 4

These blocks were super easy and fun to make, Mandy asked for fabrics in aquas/teals, green/chartreuse, grey and white.  Right in my wheel house.  I may have taken longer to pick out the fabrics than to actually assemble these blocks.  Pardon my slightly washed out pictures, I've been trying to play around with the manual mode of my new camera...sometimes I get it...sometimes I don't.  I've pinned about a gazillion DSLR tutorials I've found on pinterest, and I'm excited to them out at a few family holiday picnics this weekend!


Thursday, June 21, 2012

X Marks the Spot: Block tutorial


7404630270_6d26507b5b

This block sort of came to be as a happy accident.  You see, I had all these left over half square triangles from my Swoon Quilt from what seems like eons ago, and they were just sitting in a pile in one of the corners of my sewing room.  I'd look at them every once in a while and say "I really need to do something with those," but ultimately would put it off to work on something else.  

Flash forward to last week, I decided to pull them out, and sorted them by color and started playing around with the placement.  In the midst of my playing, this "X" pattern started to appear, and I just went with it.  In the end, I love how this block came together, and I think its great all scrappified like my version, but also would be just as great in a more planned color pattern with lots of these little guys arranged in a quilt.

My version finishes at 13.5" square, as my HSTs measured 2.75" square as leftovers.  As a 12.5" block is a little more versatile, I've adjusted the tutorial to finish at 12" square.

DSC04739-2

X marks the Spot block
12.5" unfinished block

You'll need:

(14) 2 7/8" squares white fabric
(14) 2 7/8" squares patterned fabric
(4) 2 1/2" squares white fabric
(1) 4 1/2" square patterned fabric

use scant 1/4" seam; press all seams open

1.  Draw a diagonal line down the center from corner on all white squares (wrong side).

DSC04732

2.  Match up each 2 7/8" white square with a 2 7/8" patterned square, right sides together and stitch with a scant 1/4" seam along each side of your diagonal line.  Cut along the drawn diagonal line and press seams open.  


DSC04735

4.  Trim to 2 1/2" half square triangle.

DSC04736

4.  Arrange your HSTs, white squares and larger center patterned square as shown below:

DSC04733

5.  We will be sewing the block together in segments of 4 blocks.  Sew each square into sets of 2 as shown below.

DSC04734-1

6.  Sew your sets of 2 squares into 4 block squares as shown below.

DSC04737-1

7.  Each set of 4 squares should measure 4 1/2" square (same as your centered patterned square).  Sew together the three blocks of each row.

DSC04738-1

8.  Sew together the three rows, press seams open and stand back and admire your work!

DSC04739-1

If you decide to make an X Marks the Spot block I'd love to see it!  Be sure to add it to the SewCraftyJess Flickr group!


Wednesday, June 20, 2012

WIP Wednesday {6.20.2012}

WIP Wednesday at Freshly Pieced

It's been quite the busy week around these parts, my birthday was on Monday, (so far 30 isn't too bad!) so since the hubs was working this past weekend, I thought it fitting to take myself on a little 30th birthday shop hop to a few of my favorite local quilt shops.  I came home with a good bit of loot that I'm looking forward to turning into something fun soon.  He also picked up on my not-so-subtle hints as to what I wanted for my birthday, and came home with this little guy on Saturday night:

Untitled

I could hardly contain my excitement, he went far above what I was ever expecting with this beauty.  I've been spending the last few days trying to figure out how it works (aside from auto mode) and cannot believe how great the pictures are!

As for what else I've been working on, here's whats new:

In progress

X Marks the Spot baby quilt

DSC_0070

I put the finishing touches on this baby quilt top last night and am thrilled with how it came together.  My mother in law asked if I could squeeze in a last minute baby quilt for a cousin who just had a baby, and who am I to say no.

I already had one block in the works, with the three others planned out, so by adding borders and sashing, it brought the four blocks up to a nice baby quilt size.  Plus, since the HSTs are actually left overs from my Swoon quilt, this little guy came together super quick.  A few people asked for a tutorial on this block, so I'll be back tomorrow with a tutorial for a 12.5" version of this block.

Completed Projects

Jungle Path Moda Bake Shop tutorial

Moda Bake Shop Jungle Path baby quilt

Yesterday my very first Moda Bake Shop tutorial was posted!  In case you missed it, here's the link to the tutorial.

Kitchen Facelift

DSC_0003

We put on our Bob Vila hats once again last week and finally put the finishing touches on our kitchen project!  We still need to track down white outlet covers that work with our outlet arrangements, but aside from that, were calling this one finished.  Full post complete with before and afters here.

That about sums up this weeks goings-on!  Be sure to stop over to Freshly Pieced and say hi to Sukie who is guest hosting the party this week!  


Tuesday, June 19, 2012

Moda Bake Shop Jungle Path Baby Quilt

DSC_0015

I am so excited to share not only my very first full quilt pattern, but also my very first Moda Bake Shop tutorial today!  If you have been following this blog for any amount of time, you know that I am constantly whipping up baby quilts for our friends and family who seem to be popping out babies left and right!  I suppose we are at that age and all...I remember a few years back attending so many friends weddings we couldn't keep them all straight, so it makes sense that now we are at the "baby" stage.

DSC_0020

I am always on the lookout for kiddo friendly fabric, so when I came across Jungle Bungle by Tim and Beck I knew I had to get my hands on some to put together a baby quilt.  The colors are so fun and vibrant and the patterns are just adorable (elephants in at 5 different color ways!)

DSC_0023

I'd love to hear what you think, if you have a minute, pop over to the Moda Bake Shop and leave me a comment!


Monday, June 18, 2012

Kitchen facelift and a giveaway winner

First things first, Mr. Random has chosen a winner for the EZ Dresden Ruler giveaway!


Congrats Michelle!  I'll be emailing you for your information to get you your Dresden Ruler!

And secondly, after what feels like forever (in actuality, about 3 months), our "kitchen facelift" has finally come to an end!

DSC_0005

We are just thrilled with how everything has come together, and are very much enjoying our more modern updated looking kitchen.  Just for reference, here is what we started with:

kitchen before

And here's where we ended:

DSC_0003

As you may remember, our project started with deciding to paint the cabinets.  Here is the post which detailed our process and a few great links we found very helpful during the process.  Believe you me, while we (well, more me, than the hubs, he more just goes along with my crazy ideas) are always up for a DIY project, we are definitely not professional painters, and certainly have never done anything like this before.  It took a good bit of time and patience, but the results really were great (and quite inexpensive when compared to having someone else resurface them).  

DSC_0010

The biggest expense of our project was by far the new coutertops.  Really, that's where the entire facelift idea started, and it sort of just snowballed from there.  We replaced our builder grade formica coutertops with granite.  I think the color is called Imperial Coffee, and in person, it reads more like a dark grey, with bits of dark grey, some browns, and almost a quartz-y reflective sort of stone that makes them quite pretty, if I do say so myself.

DSC_0007

We updated the sink and faucet, and also installed a new over the stove mount microwave, which saves so. much. counterspace.  Seriously, I don't know why we didn't do this the minute we moved in.

DSC_0009

Our last and final project, really was sort of a last minute decision to do ourselves.  We were planning on hiring someone to do the backsplash, but after taking forever to decide on what we wanted, it wasn't going to be finished for when we wanted it done (and it was way more expensive than we had thought it would be!) Soooo...whats any DIY-er to do?  Do it ourselves!

DSC_0006

We had even less experience doing any sort of tiling than experience painting cabinets, but it was surprisingly easy.  We picked tiny 3/4" glass square tiles that came on 1 square foot sheets, which made installing it a breeze.  Because the tiles were so small, we could simply cut the sheets, and didn't need a tile cutter for fitting around the outlets and window.  Double bonus that we did it for less than half than the estimate the pro's gave us, and that was including using a more expensive tile than the tile in the pro's quote. 

When all was said and done, this took the better part of a Saturday morning and afternoon for the hubs and I to install the mortar and tile, and then maybe 3 or 4 hours to finish the grout a few days later. 

DSC_0008

We are just thrilled with the way the kitchen has come together, and its even better knowing we did so much of it ourselves!  Were taking a breather from home improvement projects for a little while, but I still have my dining room re-do idea on the brain, and after tackling painting the cabinets, I may have just enough courage to tackle painting the dining room furniture!


Thursday, June 14, 2012

EZ Dresden Challenge: Strip Pieced Dresdens

Welcome to the last and final blog stop for the EZ Dresden Quilting Challenge kick off!  I'm sure by now you've caught wind of this great challenge the Salt Lake Modern Quilt Guild  is hosting with Simplicity, but if you haven't, check out this post with all the details about the challenge...and the prizes!!  Oh yes, there are prizes, and they are good ones!


DSC04701

For my project, I decided to stick with the traditional dresden layout, but spice things up a bit!  This represents one of my most favorite things about quilting in general, how something so "traditional" can be shaken up to be modern with a simple twist or a change in fabric.

I thought this would be the perfect opportunity to dig into my Flea Market Fancy stash, and cut strip pieced dresden plates.  I paired this with some Kona Azure, and a Lotta Jansdotter Echo print for the binding.  I am super happy with my "dresden with a twist" pillow, just enough fancy to brighten up our living room.

If you'd like to make your own, see below for the tutorial, and don't forget to scroll to the bottom of this post to check out the giveaway to win your own EZ Dresden ruler!

Strip Pieced Dresden Pillow Tutorial

strip pieced dresden pillow

This pillow cover will fit an 18" pillow form as pictured, or a 20" pillow form snugly

You'll need:
(6) assorted fabric strips 1.5" wide measuring a total of 60" in length (I used fat quarters and cut three 1.5" strips from the 22" side of each FQ)
background fabric measuring 18.5" square
5" square of fabric for center circle
5" square of lightweight fusible interfacing
(2) pieces fabric measuring 25" x 18.5" for envelope pillow back
(2) strips of fabric measuring 2.5" x WOF (44 inches) for binding
18" pillow form

All Seams sewn with 1/4" seam, unless otherwise noted.  Press all seams open.

Instructions:
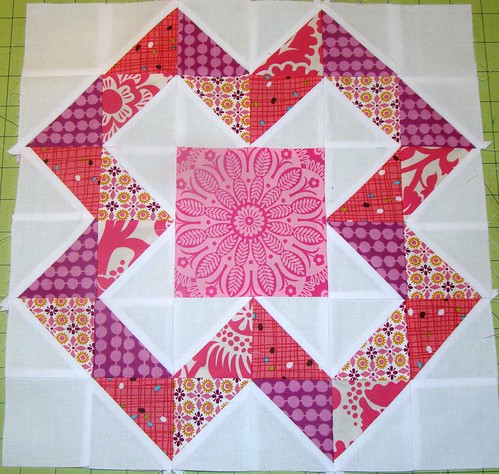
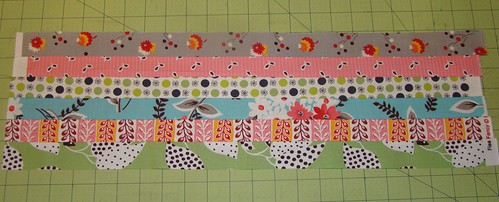
1.  Sew strip sets of your 6 different fabric strips, taking care to sew each strip set in the same fabric order.

DSC04662

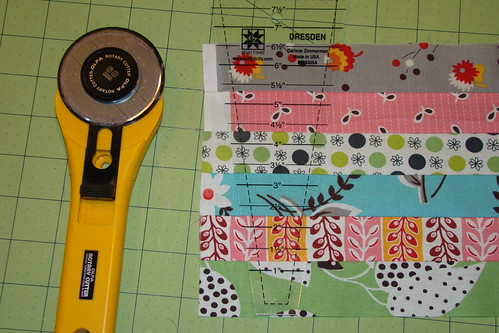
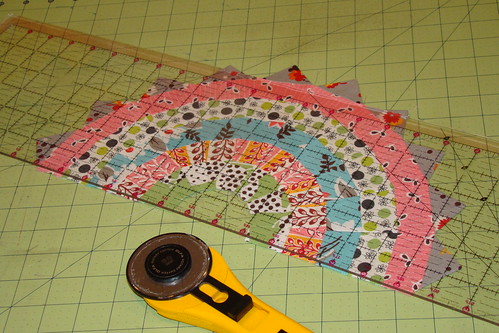
2.  Align your EZ Dresden Ruler along the bottom edge of your strip of fabrics.  The top edge should align with the 6 1/2" marking on the ruler.  Cut along both long edges of the dresden ruler with your rotary cutter.

DSC04666

3.  Repeat this process until you have 20 wedges (I could get 7 wedges per strip set using strips from a FQ), taking care to align the ruler along the same edge each time.  In my example, the green fabric will always be the at the narrow end of the wedge.

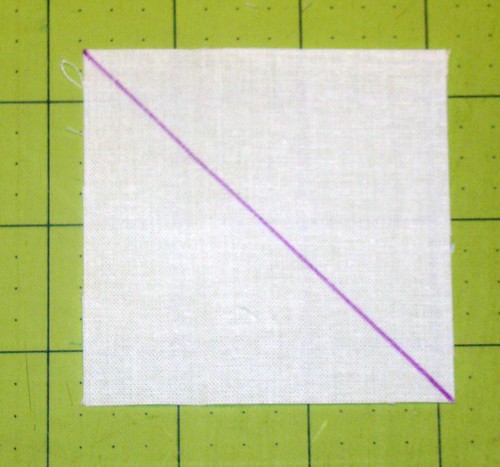
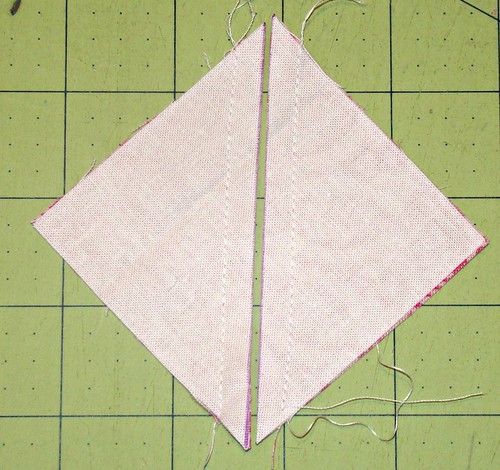
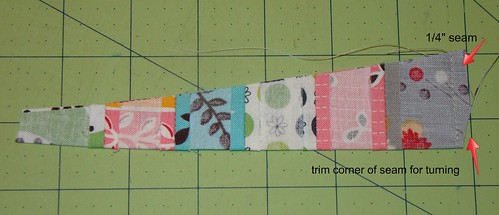
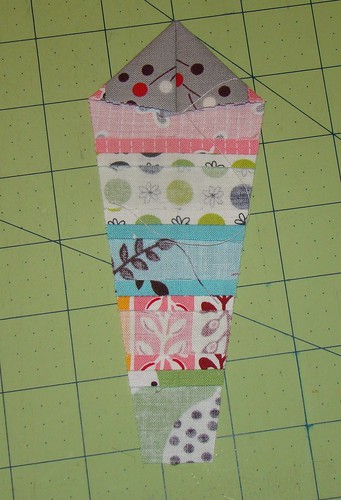
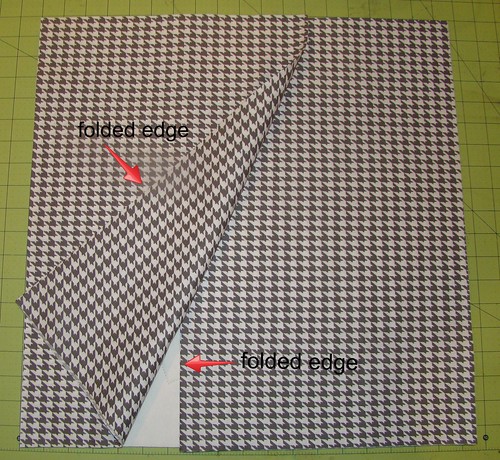
4.  Fold each wedge in half lengthwise, right sides together.  Sew a 1/4" seam along the "fat" short edge of your wedge.  Trim the seam along the folded half to reduce bulk for turning.

DSC04668

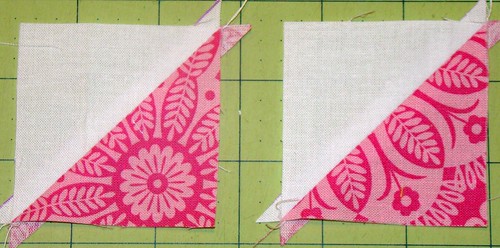
5.  Turn the "fat" edge of your wedge that you just sewed, so that the wrong sides are together and a "point" forms.  Center the point along your pressed center line.  Use a pointed object if necessary to form a nice crisp point.  Repeat with remaining 19 wedges.

DSC04669

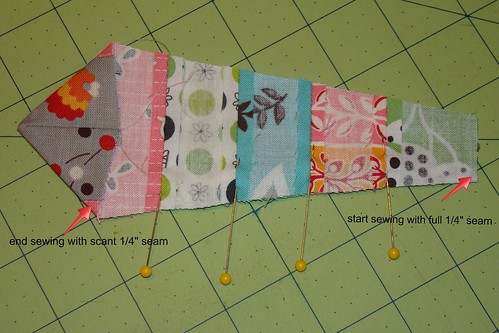
6.  Once all your wedges have points, we will begin sewing our wedges into a circle.  Choose two wedges, and pin along one long edge, right sides together, taking care to align the seams.  Sew the two wedges together.
  **Tip:  I find it helpful in achieving a nice flat resulting dresden to begin sewing my wedges together starting at the narrow end of the strip, and start with a full 1/4" seam, tapering to a scant 1/4" inch seam at my point edge.

DSC04670

DSC04671

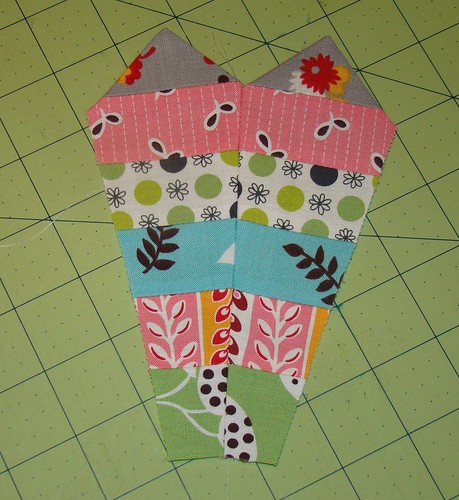
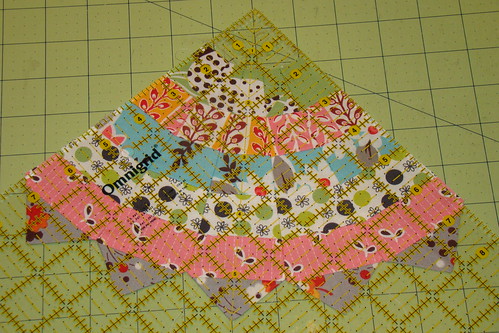
7.  I like to sew my dresden together in quarters.  Sew (4) sets of 5 wedges together.  Before sewing your dresden quarters together, align the raw edges with the 90 degree edge of a square quilting ruler.  If your edges do not 100% line up, trim your edges to a perfect 90 degree angle.  This will help your dresden lie nice and flat when assembled.

DSC04672

8.  Sew (2) quarter dresden pieces together to have 2 dresden halves.  Again, trim your halves, this time using a long straight edge quilting ruler.

DSC04675

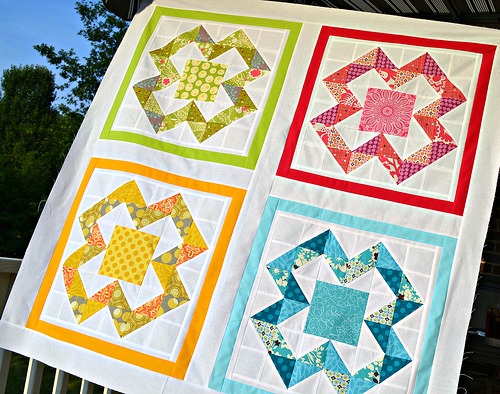
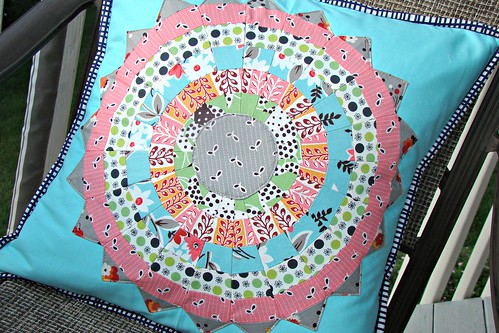
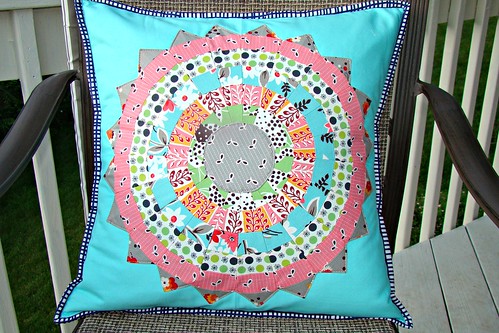
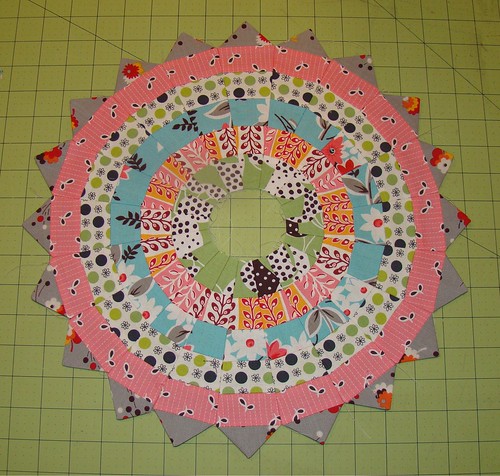
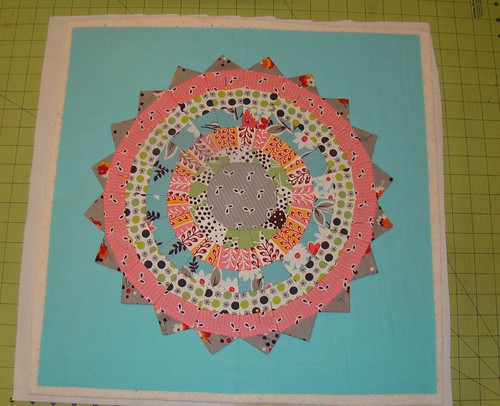
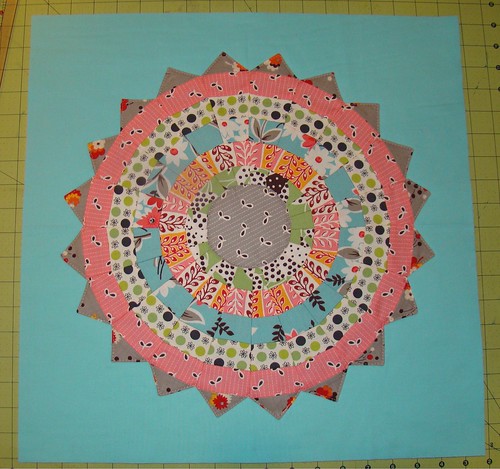
9. Sew your two dresden halves together, and admire your work!

DSC04677
10.  Take your background fabric and fold in half, press a crease.  open fabric, and press in half the other direction, to mark the center.  Center your dresden on your background fabric and pin in place.  Set aside.

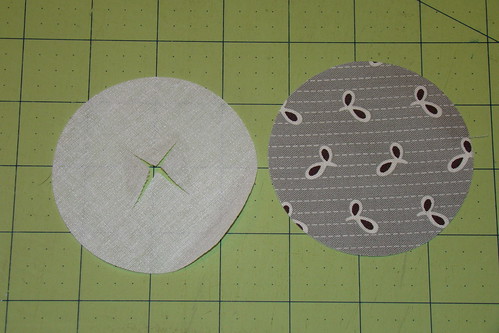
11.  To form the center circle, take your 5" squares of fabric and interfacing, and trace a circle, measuring approximately 4" in diameter and cut out of both materials.  Cut a slit in the center of your interfacing, this will allow us to turn the circle right side out after sewing.


DSC04678

12.  Layer the fabric right side up and the interfacing adhesive side down, and stitch around the edges appx 1/4".  

DSC04679

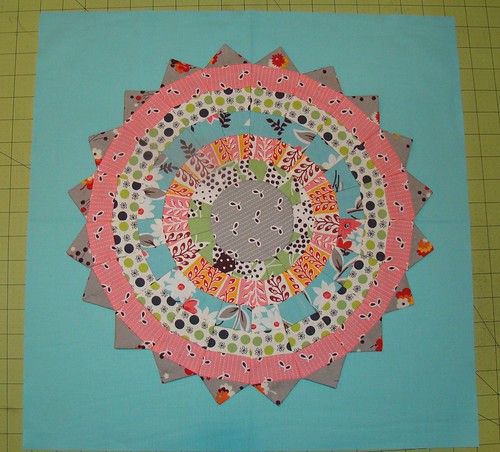
13.  Turn your circle right side out through the slit in the interfacing.  Align your center circle in the center of your dresden plate and press into place.

DSC04681

14.  From here, you can choose how to finish your dresden.  I chose to layer a backing fabric, batting and then my dresden, spray basting my layers together.  I then appliqued my dresden plate on to my background fabric by sewing appx 1/8" along the edge, and then along the edge of my center circle, so my appliqueing did double duty as the quilting as well.  

DSC04682

DSC04683

15.  To finish the pillow back, fold your two pieces of 25" x 18.5" fabric in half wrong sides together, so each piece measures 12.5" x 18.5".  Layer your dresden pillow front right side down, one of your pillow back pieces, with the raw edges aligned to the top, bottom and left, and the second pillow back piece with the raw edges aligned to the top, bottom and right.

 DSC04686

16.  Carefully flip your aligned pillow front and back over, so that your pillow front is facing up.  Pin in place and baste with a 1/8" inseam to hold the front and back together.

17.  Sew binding strip in place around all four edges, insert pillow form, and enjoy!

DSC04701

To get you started on your own dresden project, I've got one EZ dresden ruler to giveaway!  Leave me a comment on this post, any old comment will do, to enter to win your own EZ Dresden ruler.  Mr. Random will draw a winner on Sunday, June 17th.  

Thanks so much for stopping by, in case you missed any of the previous blog stops, here is a schedule of all the stops on the blog hop, filled with all sorts of EZ Dresden inspiration, happy sewing!

June 1:  Salt Lake MQG: Kick Off www.slmqg.com/

June 3:  Katie www.fromthebluechair.com/

June 4:  Victoria: bumblebeansinc.blogspot.com/ 
             Leigh: leedledeedlequilts.blogspot.com/
June 6:  Amy: amyscreativeside.com/ 
            Elisa www.stitchoutsidetheditch.com/
June 7:  Katie: www.swimbikequilt.com/
             Emily: emsscrapbag.blogspot.com/
            Brooke: pitterputterstitch.blogspot.com/
June 9:  Nicole: mamalovequilts.blogspot.com/
            Amy sukie.mt-wudan.com/
June 10:  Elizabeth: www.dontcallmebetsy.com/
              Colleen: www.thebusybean.com/
June 11:  Faith: www.freshlemonsquilts.com/
              Deonn: quiltscapesquilting.blogspot.com/
June 12:  Angela: angelaflicker.com/
June 13:  Amy: www.diaryofaquilter.com/
June 14:  Jessica: sewcraftyjess.blogspot.com/
June 15:  Salt Lake MQG: Wrap-up www.slmqg.com/