Monday, September 16, 2013

let the sunshine in

Nursery Progress

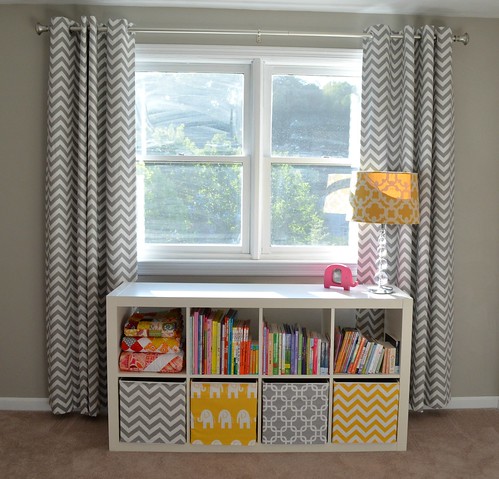
Or I guess I should say "keep the sunshine out."  I promise I think this will be the last nursery DIY post that I will overrun you with, and then we will return to our regularly scheduled quilty programming.  But I'm pretty darn proud of myself that I sewed my first set of curtains, black out curtains to be exact AND they ended up just about the same length as one another!!  I had anxiety throughout this entire project that my panels were going to end up wildly off in length but luckily I think they are off by just about a half an inch (don't look too closely!), which I can totally live with.

Nursery Progress

After muttering quite a few curse words while measuring yards and yards of fabric on the kitchen floor and cutting without the safety net of my quilting rulers and fabric that measures a nice 22" when folded and fits nice and perfectly on my cutting mat, you can believe I did the happiest of happy dances after putting in that last grommet and getting these bad boys hung.  I am so so incredibly pleased with how they turned out that I don't even remember those muttered curse words and stress now that its over (that's how childbirth works, right???)

Nursery Progress

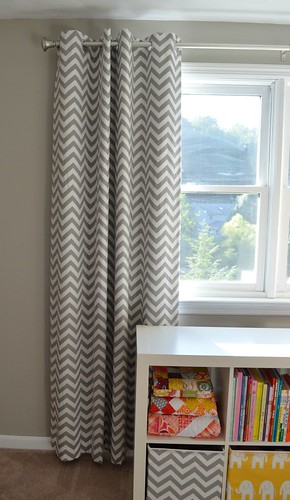
I used the Premiere Prints Zippy Chevron in Storm (which I see is now on sale!) and it was the perfect weight for curtains.  Definitely a home dec weight fabric, but not too heavy.  I backed these with Ron-Loc white blackout fabric that I picked up at Joann's and also grabbed two sets of 8 plastic grommets for hanging on the curtain rod.  This was my first time using grommets period, and it was so so incredibly easy.  I spent quite some time looking at different tutorials for lined curtains, and ultimately settled on this tutorial, as it didn't require using my blind hem stitch (I'm a quilter and have no idea what that is!) and was relatively easy to follow along with, definitely recommend it and will use it again if I ever get the urge to sew more curtains.

Nursery Progress

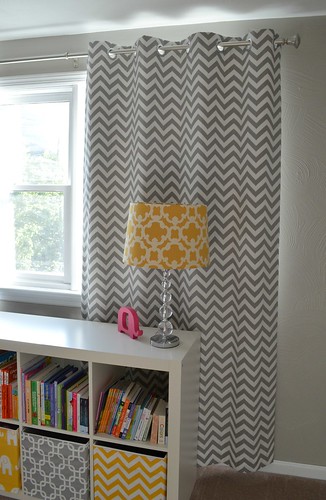
These guys really do a great job and blocking out light, after my husband saw these, he requested a set for our bedroom as well.  Of course I have a few other things on my mind at the present moment, but perhaps after things settle down, I'll tackle a second set.  This might just about do it for nursery projects, we have an electrician coming to install an overhead light for the room, and yes I'm grumbling that none of our bedrooms have overhead lights, and a few more storage type bins to pick up and the nursery should be in  the books!

This weeks goal is to get the hospital bags packed and be ready to go, I cannot believe how quickly time has gone, I feel like we were just telling people about being pregnant and here we are (hopefully) 4 weeks away from D-Day!!

Wednesday, September 11, 2013

a gal can't have too much voile: {completed quilt}

DSC_1224

Really, the title of this post should say "a gal can't have too many quilts," because things may be getting a little out of hand here, and yes, I'm not ashamed to admit I have one more baby quilt in the works that will match the nursery colors, grey and yellow (with bits of pink, of course).  We have scheduled a newborn photo session with a local photographer, and I'm really considering taking all these baby quilts and requesting a photo like this one, or this one, as what would be more fitting for a baby of a quilting mama, than a picture on a giant stack of quilty goodness.

DSC_1226

This quilt was made using my fat eighth bundle of AMH voiles from Westwood Acres and I could not be more pleased with how this quilt has come together.  The voiles have such a nice hand, so soft and luxurious.  I used Red Pepper Quilts Postage Stamp Tutorial, only increased my strip size like she did here, so that my finished squares are 2.5".  I sorted my bundle the best I could into cool fabrics and warm fabrics, and when pairing my strips alternated cool and warm, as I wanted to make sure I didn't end up with the same fabrics right next to each other, or big pools of cool or warm prints in different areas of the quilt.  This approach worked perfectly and I'm really happy with the finished layout.

DSC_1229

I actually have enough fabric left from my fat eighth bundle to make a second of these quilts, which I'm thinking will be destined to a good friend who is also due with a little lady of her own in a few short weeks.

DSC_1231

As for the quilting, I briefly thought about hand quilting this with perle cotton, but ultimately decided against it, as I didn't want to get stuck half way through and not finish.  This quilt is just too pretty to end up in the WIP pile.  I went with super simple straight line quilting 1/4" on either side of the seam lines.  I think the simple quilting really lets the fabrics shine.  I'm thinking I just channeled my inner Rita for this entire quilt :-)

DSC_1237

I was a little hesitant when I started quilting, as I've heard horror stories of quilting with voile, fabric shifting, puckers and lots of not so nice things happening, but I'm happy to report I experienced none of those.  Of course I used my walking foot and went slowly, but I also was sure to baste extra carefully, using a combination of spray basting (my usual), and then pin basting every 10 inches or so to make sure no shifting occurred.

This quilt has since been washed, dried and sufficiently crinkled, and is now up in the nursery just waiting for the little miss to make her arrival next month!

Quilt Stats

Quilt Name:  AMH voile postage stamp baby quilt
Size:  40" x 40"
Fabrics Used:  AMH voile fat eighth bundle 
Backing:  Heather Bailey Daisy Pop
Binding:  Violet Craft Madrona Road Haystack in Fuscia
Quilting:  Straight line quilting 1/4" from each seam line


Friday, September 6, 2013

now I know my ABC's

Nursery Progress

Baby girls nursery is starting to come together, and actually resemble a place where baby can sleep and eventually play.  Way back when we first found out I was pregnant, I think one of the first things I did was start scouring Pinterest for nursery inspiration.  I came across this framed wooden letter alphabet snapshot and knew that whether boy or girl, no matter what color scheme we decided on, I had to make something like it.

Nursery Progress

I really could not be more thrilled with how this turned out!  After finding a whole slew of alphabet wooden letter options on both Etsy and Ebay, I settled on this set, and was really pleased with what I received.  Their customer service was also top notch, as Amanda was super sweet when I contacted her concerned that I was missing letters, and had duplicates of others, when in fact I had the "y" upside down as an "h", the "q" upside down as a "b", and was convinced my Q was missing.  Needless to say she very nicely sorted out my mess of letters.  I blame pregnancy brain :-)

I went back and forth deciding how to finish the letters, and ultimately settled on modge podge and scrapbook paper.  This tutorial explains the process perfectly and was so incredibly easy, I covered all the letters in one weekend.  Instead of using an Exacto knife, I found scissors worked just fine, and I skipped the sanding step, as I was mounting them on the wall, it seemed a little overkill.  As for the scrapbook paper, I was less than thrilled with my local craft store's selection in yellows and greys, so I nabbed a few digital packs from mooandpuppy on Etsy and had them printed on cardstock at my local Office Max.

Nursery Progress

As for finishing off the frame and display, I bought a sheet of bead board from Lowes and had them cut it for me in the store to my desired dimensions, and then bought 2 strips of prefinished baseboard trim, that I took over to my parents and had my dad miter cut into a frame.  A little Elmers wood glue worked perfectly to affix the letters to the board, as well as to attach the outer frame.  I did use a few clamps when attaching the frame portion to make sure it really stuck together.

Again, I am so so incredibly pleased with how this turned out.  It is very large, measuring about 3 1/2" feet x 3 1/2" feet when all was said and done, but I'm ok with that as its sort of the piece de resistance of the nursery, centered over the dresser/changing table.

Nursery Progress

There's a whole smorgasbord of DIY happening in this little area of the nursery...who am I kidding, there's a whole lot of DIY throughout the entire nursery!  But for this little portion, I did make a cover for the changing pad, one of Noodlehead's divider baskets and a fun little hombre paint chip elephant display.

Nursery Progress

I couldn't find a changing pad cover that I really loved in grey and yellow, so I decided to make one myself.  This was incredibly easy, only requiring me to buy a yard of Minky and elastic, and using a half yard cut of Riley Blake yellow chevrons I had on hand.  Within an hour I had finished the cover and am pleased with the finished product.  I followed this tutorial, and the Minky was much easier to work  with than I had originally envisioned!  I actually grabbed another yard of Minky in yellow and paired it with a grey accent cotton piece to have as a backup.

Nursery Progress

I also decided I needed a divider basket to have diapers and changing essentials within arms reach, and of course it had to be cute :-)  Enter Noodhead's divided basket pattern.  Best $6.50 I have ever spent.  This basket came together quickly and easily in about 2 1/2 hours one evening, and easily half of that time was spent cutting out pattern pieces.  I see a few more of these baskets in my future, as baby can never have to many cute baskets to hold all of her cute things.

I am digging this nursery so so much, and am glad we went with a more neutral color palate with bits of pink here and there.  Lord knows this child has enough pink clothing to stock a boutique, so I figured we could do pink-lite in the nursery.  I'll be back with a few more projects, and hopefully a full nursery reveal soon!


Tuesday, September 3, 2013

Raspberry Orange Chevrons: A Baby Quilt Finish

DSC_1214

I feel likes its been absolutely eons since I last finished a quilt, and really it probably has been.  This quilt top has been hanging around my sewing room since July just waiting ever so patiently to be basted and quilted.  I have to say, even when I'm not 8 months pregnant basting is my absolute least favorite step of the quilting process, and now that I feel about ready to pop, I like it even less, if that's possible.

DSC_1215

After giving myself a little pep talk, I mustered up the energy and got on my hands and knees and basted like there was no tomorrow.  Luckily the quilt tops that are hanging around my sewing room are all baby size, so that at least makes it manageable.

DSC_1218

While perusing Joann's one day, I came across this faux swirl fur fabric and knew it had to come home with me to be the backing fabric for this quilt.  It is the softest cuddliest fabric I think I have ever felt, and will be just perfect for colder winter days, and the fuscia color compliments the quilt top so well.

DSC_1219

While I am in love with the final product, I can't say I was in love with the quilting process.  I did an all over loopy free motion quilting design (one of my standard go-to's), and between the weight this heavy backing fabric added to the quilt, and the fact that the nap of the fabric sort of made the quilt "stick" to my sewing machines quilting area/extender table, it was a less than enjoyable experience.

I found I had to "grab" the quilt in my fists and push/pull it,  as opposed to simply gliding it under my finger tips with quilting gloves like normal was the only way to successfully maneuver the quilt.  Good thing this was only a baby size quilt, because my arms were certainly feeling it!  I had a little bit of tension issues in the beginning, mainly that my upper thread kept breaking, but I found with a slow and steady approach, and setting my tension super low (I usually sew/quilt around 5, and had my machine at 2.5-3), seemed to fix the problem.  I also found in certain spots that some of the backing "fur" pulled up slightly through to the front of the quilt where my needle pierced through the fabric.  Using a slightly smaller needle helped a little, but its still visible in certain spots, especially on the white parts of the quilt.  I will say once it was washed and crinkled, its much much less noticeable, and given the uber soft and cuddly-ness of this quilt, I'll take that trade off.

DSC_1222

This quilt has been folded and added to baby girls quilt stash, which is very quickly growing to quite a pile, but a girl can never have too many quilts, right??

Quilt Stats

Name: Raspberry Orange Chevron baby quilt
Pattern: None, designed using an array of print/print and print/white HSTs
Size:  45" x 45"
Backing: Faux Swirl Fur in Fuscia
Binding: Timeless Treasures Sketch in Candy
Quilting: All over loopy FMQ