
Welcome to the last and final blog stop for the EZ Dresden Quilting Challenge kick off! I'm sure by now you've caught wind of this great challenge the Salt Lake Modern Quilt Guild is hosting with Simplicity, but if you haven't, check out this post with all the details about the challenge...and the prizes!! Oh yes, there are prizes, and they are good ones!

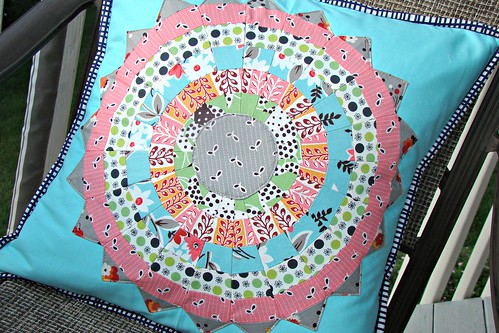
For my project, I decided to stick with the traditional dresden layout, but spice things up a bit! This represents one of my most favorite things about quilting in general, how something so "traditional" can be shaken up to be modern with a simple twist or a change in fabric.
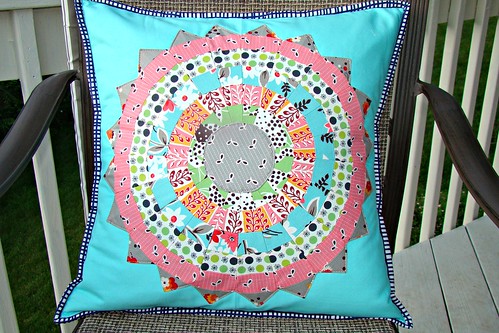
I thought this would be the perfect opportunity to dig into my Flea Market Fancy stash, and cut strip pieced dresden plates. I paired this with some Kona Azure, and a Lotta Jansdotter Echo print for the binding. I am super happy with my "dresden with a twist" pillow, just enough fancy to brighten up our living room.
If you'd like to make your own, see below for the tutorial, and don't forget to scroll to the bottom of this post to check out the giveaway to win your own EZ Dresden ruler!
Strip Pieced Dresden Pillow Tutorial
This pillow cover will fit an 18" pillow form as pictured, or a 20" pillow form snugly
You'll need:
(6) assorted fabric strips 1.5" wide measuring a total of 60" in length (I used fat quarters and cut three 1.5" strips from the 22" side of each FQ)
background fabric measuring 18.5" square
5" square of fabric for center circle
5" square of lightweight fusible interfacing
(2) pieces fabric measuring 25" x 18.5" for envelope pillow back
(2) strips of fabric measuring 2.5" x WOF (44 inches) for binding
18" pillow form
All Seams sewn with 1/4" seam, unless otherwise noted. Press all seams open.
Instructions:
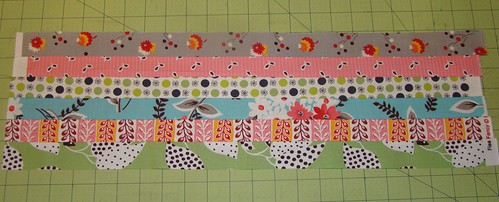
1. Sew strip sets of your 6 different fabric strips, taking care to sew each strip set in the same fabric order.


(2) pieces fabric measuring 25" x 18.5" for envelope pillow back
(2) strips of fabric measuring 2.5" x WOF (44 inches) for binding
18" pillow form
All Seams sewn with 1/4" seam, unless otherwise noted. Press all seams open.
Instructions:
1. Sew strip sets of your 6 different fabric strips, taking care to sew each strip set in the same fabric order.
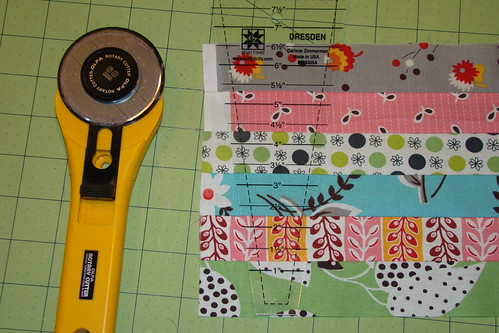
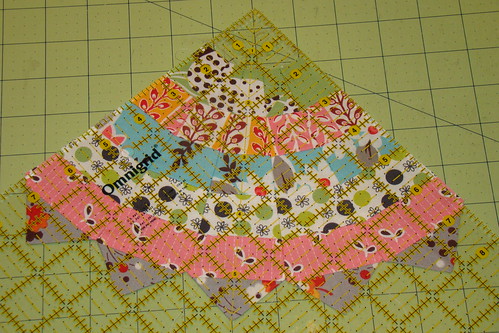
2. Align your EZ Dresden Ruler along the bottom edge of your strip of fabrics. The top edge should align with the 6 1/2" marking on the ruler. Cut along both long edges of the dresden ruler with your rotary cutter.
3. Repeat this process until you have 20 wedges (I could get 7 wedges per strip set using strips from a FQ), taking care to align the ruler along the same edge each time. In my example, the green fabric will always be the at the narrow end of the wedge.
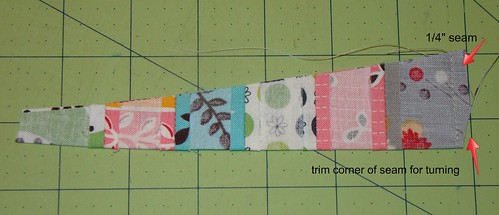
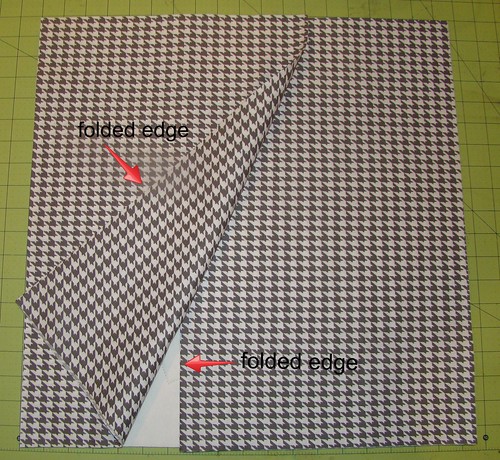
4. Fold each wedge in half lengthwise, right sides together. Sew a 1/4" seam along the "fat" short edge of your wedge. Trim the seam along the folded half to reduce bulk for turning.
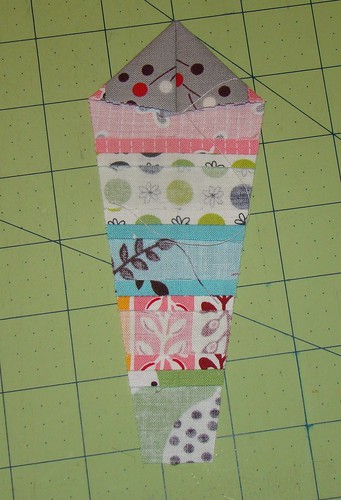
5. Turn the "fat" edge of your wedge that you just sewed, so that the wrong sides are together and a "point" forms. Center the point along your pressed center line. Use a pointed object if necessary to form a nice crisp point. Repeat with remaining 19 wedges.
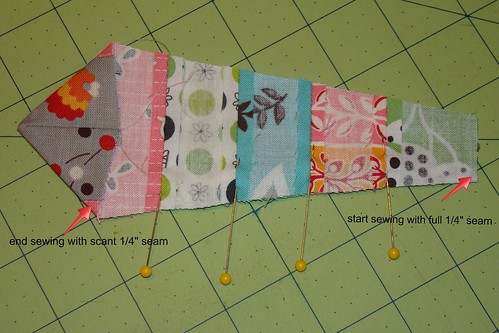
6. Once all your wedges have points, we will begin sewing our wedges into a circle. Choose two wedges, and pin along one long edge, right sides together, taking care to align the seams. Sew the two wedges together.
**Tip: I find it helpful in achieving a nice flat resulting dresden to begin sewing my wedges together starting at the narrow end of the strip, and start with a full 1/4" seam, tapering to a scant 1/4" inch seam at my point edge.
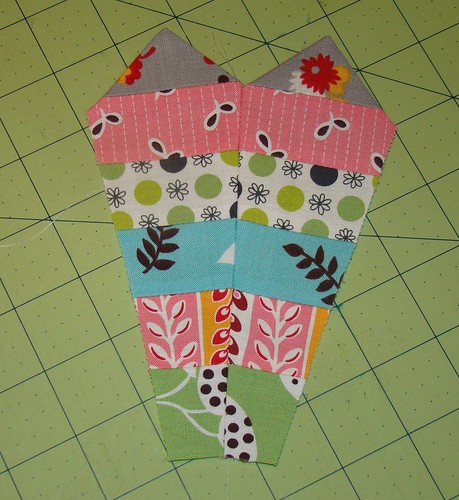
7. I like to sew my dresden together in quarters. Sew (4) sets of 5 wedges together. Before sewing your dresden quarters together, align the raw edges with the 90 degree edge of a square quilting ruler. If your edges do not 100% line up, trim your edges to a perfect 90 degree angle. This will help your dresden lie nice and flat when assembled.
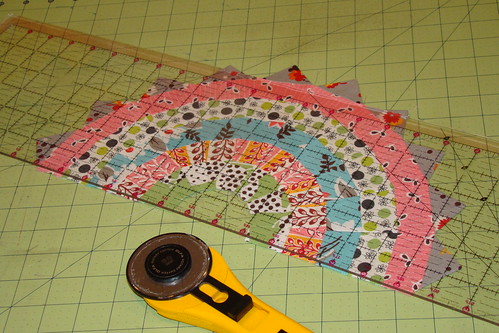
8. Sew (2) quarter dresden pieces together to have 2 dresden halves. Again, trim your halves, this time using a long straight edge quilting ruler.
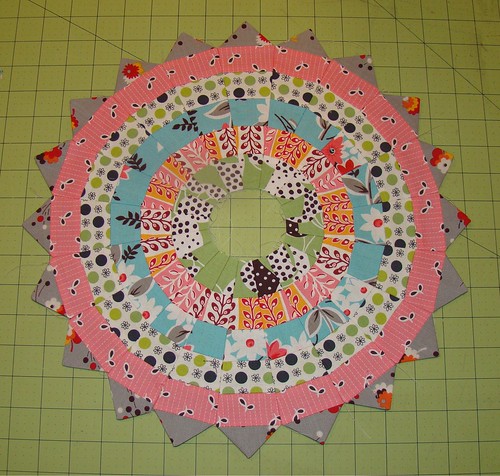
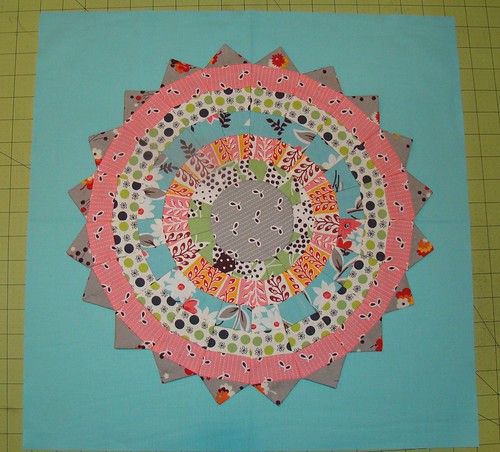
9. Sew your two dresden halves together, and admire your work!
10. Take your background fabric and fold in half, press a crease. open fabric, and press in half the other direction, to mark the center. Center your dresden on your background fabric and pin in place. Set aside.
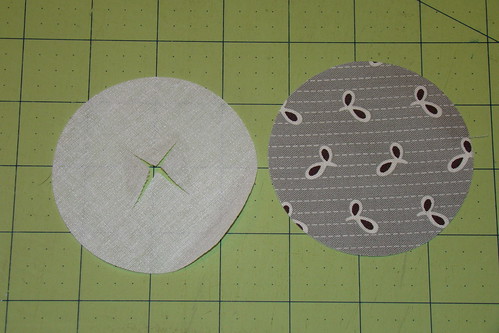
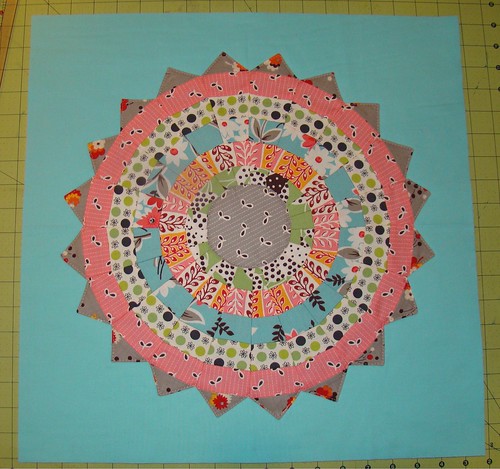
11. To form the center circle, take your 5" squares of fabric and interfacing, and trace a circle, measuring approximately 4" in diameter and cut out of both materials. Cut a slit in the center of your interfacing, this will allow us to turn the circle right side out after sewing.
12. Layer the fabric right side up and the interfacing adhesive side down, and stitch around the edges appx 1/4".
13. Turn your circle right side out through the slit in the interfacing. Align your center circle in the center of your dresden plate and press into place.
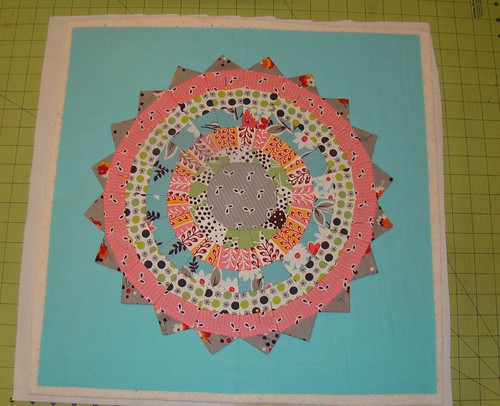
14. From here, you can choose how to finish your dresden. I chose to layer a backing fabric, batting and then my dresden, spray basting my layers together. I then appliqued my dresden plate on to my background fabric by sewing appx 1/8" along the edge, and then along the edge of my center circle, so my appliqueing did double duty as the quilting as well.
15. To finish the pillow back, fold your two pieces of 25" x 18.5" fabric in half wrong sides together, so each piece measures 12.5" x 18.5". Layer your dresden pillow front right side down, one of your pillow back pieces, with the raw edges aligned to the top, bottom and left, and the second pillow back piece with the raw edges aligned to the top, bottom and right.
16. Carefully flip your aligned pillow front and back over, so that your pillow front is facing up. Pin in place and baste with a 1/8" inseam to hold the front and back together.
17. Sew binding strip in place around all four edges, insert pillow form, and enjoy!
To get you started on your own dresden project, I've got one EZ dresden ruler to giveaway! Leave me a comment on this post, any old comment will do, to enter to win your own EZ Dresden ruler. Mr. Random will draw a winner on Sunday, June 17th.
Thanks so much for stopping by, in case you missed any of the previous blog stops, here is a schedule of all the stops on the blog hop, filled with all sorts of EZ Dresden inspiration, happy sewing!
June 3: Katie www.fromthebluechair.com/
June 4: Victoria: bumblebeansinc.blogspot.com/
June 5: Val: howaboutpinkplease.blogspot.com/
June 6: Amy: amyscreativeside.com/
Emily: emsscrapbag.blogspot.com/
Brooke: pitterputterstitch.blogspot.com/
Colleen: www.thebusybean.com/
I have seen lots of great dresden projects on blogs this week and now I NEED one of these rulers even though I didn't know it before these posts! Your pillow is gorgeous, thanks for the chance to win!
ReplyDeleteWonderful pillow. Thanks for the tutorial.
ReplyDeleteAbsolutely gorgeous! This is my favorite project so far!
ReplyDeleteAll the tiny pieces make it look like you spent forever paper piecing it.
Thanks for a great tutorial!
I have a few pieces of FMF - this would be perfect for them!
ReplyDeleteThanks!
Thank you for all of your sewing tips. They are very helpful and make it easy to understand. Your pillow is just lovely.
ReplyDeleteThanks for the tutorial. Using fusible interfacing for the center circle is a great idea!
ReplyDeleteThis pillow is gorgeous. Thanks for the tutorial. The tip on squaring the sections is terrific. So is cutting the X in the interfacing before sewing to the center circle.
ReplyDeleteAwesome tutorial...I LOVE your pillow!
ReplyDeleteI love the traditional with FMF, way easier than it looks too. Thanks Jessica!
ReplyDeleteGorgeous pillow, thanks for the tutorial.
ReplyDeleteWhat a great idea! This is so cheerful and a modern take on a traditional design. I am dying to try this ruler out now!
ReplyDeletewhat a great idea for the pillow....thanks for the tut
ReplyDeleteThis is FABULOUS!
ReplyDeleteOh I love this! Thanks so much for sharing!! What a beautiful take off the traditional!
ReplyDeleteI've made quite a few Dresdens in my day, but you just gave me about 5 new tips I don't think I've ever seen before- I can't wait to try them out! Thanks!!
ReplyDeleteYour pillow is just Jazzy! I love the fabric choices, the black and white back/ boarder adds that little something special!
ReplyDeleteAnother inspirational idea!
Tootles,
Mindy
This is "awesomesauce" as my goddaughter would say. I love the idea of using stripped piecing. Thank you for sharing!
ReplyDeletegreat project, love the striped Dresden!!
ReplyDeleteLove your dresden pillow! Thanks for the chance to win the ruler.
ReplyDeleteThis is so great! I want that pillow in my home right now!
ReplyDeleteI love this pillow. It is just gorgeous. The piecing is beautiful too.
ReplyDeleteCute pillow! I like how the points are just the gray fabric.
ReplyDeleteOh my goodness! This is so beautiful!
ReplyDeleteWhat a gorgeous pillow. Thank you so much for such a great tutorial too. I love the way you've done this and only hope I can manage to create one as beautiful myself. I really love your pillow.
ReplyDeleteGreat tutorial! I adore you dresden pillow/cushion! The dresden is so versatile and you've made a truly beautiful one! Love your fabric choices too!
ReplyDeleteJess, this color combo is adorable! Great tutorial, and what a good tip to square up each quarter so the final circle lies flat - I've learned something new every day of this hop!
ReplyDeleteBeautiful! Thanks for the great tutorial and giveaway. ksanderson@hotmail.ca
ReplyDeleteI'm really inspired by your efforts here. I'm going to have a go at it. Thanks.
ReplyDeleteWhat a great idea! Thanks for sharing.
ReplyDeleteI love the Flea Market Fancy line!
ReplyDeleteI love your pillow, and have bookmarked the tutorial so that I can try it - your directions are clear and the photos help too!
ReplyDeleteLOVE your dresden wheel. :) Thanks for the chance.
ReplyDeleteIt's awesome Jess! So original.
ReplyDeleteWhat a wonderful pillow, love the design, love the fabrics and colors you used.
ReplyDeleteSo fun.
I need new pillows AND I want to try Dresdens. Perfect combination! and I love the strip piecing. So pretty.
ReplyDeleteI love the colors in your dresden! Also, it's a great reminder to trim your quarters and halves to get a really nice circle...it's common sense to quilters but I seem to skip over these things some times. Thanks for the tutorial !
ReplyDeleteLove love love the pillow! Awesome tutorial, thank you Jessica!
ReplyDeleteThat has got to be the most fabulous pillow I have seen in awhile!
ReplyDeleteWhat a fantastic pillow! Great tutorial too! Can't wait to try this!
ReplyDeleteGreat pillow - i love the piping and fabric you used. thanks for the tutorial!
ReplyDeletelove the dresden pillow! love the way you put the backing on. the only pillow patterns i've looked at had zippers. your way is much, much easier! thanx!
ReplyDeleteLove your pillow, hadn't thought about doing that, will give it a try so thanks for the tutorial. Barbara in western NC
ReplyDeleteI love your dresden. I also love when traditional meets modern. You captured that perfectly.
ReplyDeleteBeautiful pillow! Thanks for the giveaway!
ReplyDeleteI love projects with dresdens, and that ruler would be super helpful! The pillow came out beautifully!
ReplyDeleteI love the way that the outer grey strip ends up looking like giant rick rack around the Dresden plate.
ReplyDeleteI've been eying Flea Market Fancy for a while now. I love what you did with it. Thanks for the tutorial. Keeping my fingers crossed for that ruler. Thanks for the chance.
ReplyDeleteI like the way the bands of colors circle the design. Lovely! Thanks for sharing.
ReplyDeleteBarb@Witsend
I love that all your circles match, ( I know that is the idea) and a great tutorial too. Thanks
ReplyDeleteI love your pillow and your tutorial is awesome!!! I would really like to win a ruler like this.
ReplyDeleteThe fabric choices are wonderful and look like lace. Thanks for the sharing your project.
ReplyDeleteOh, wow, I love how you've done this, so effective as a technique!
ReplyDeleteI love your pillow! ^^
ReplyDeleteJust a lovely variation of dresdan and like it very much in the pillow.
ReplyDeleteGorgeous!
ReplyDeleteI would love to try one of these rulers! Great choice on the binding fabric!
ReplyDeleteI like this idea. I am trying to come up with a fresh idea for the quilt challenge and your group is really making it hard to find a "new" idea . You are all so clever. Thanks for the tutorial. Makes it easy to do this.
ReplyDeleteOh my- this is so very cool. I would love to give your tutorial a try.
ReplyDeleteI keep entering to win one of these. I really like what you did with it. The punch of B&W really modernizes it. Very clever.
ReplyDeleteI am so excited to try your tutorial for sofa pillows as my old store bought ones are no where near as cute or fun.thank you for the giveaway chance!
ReplyDeleteI am so excited to try your tutorial for sofa pillows as my old store bought ones are no where near as cute or fun.thank you for the giveaway chance!
ReplyDeleteWoW! What an amazing pillow! Your dresden is so gorgeous. What a great idea to sew strips and use. Thanks for your tutorial as well. This is on my to-do list.
ReplyDeleteThank you and SLMQG for a great giveaway and a chance to win.
usairdoll(at)gmail(dot)com
Porquê será que tudo que você faz fascina?...Linda inspiração,parabéns.Obrigada.tiacarminhapezzuto@gmail.com
ReplyDeleteThanks for the chance to win! I love the pillow. SO cute ;)
ReplyDeleteLove your pillow, and love the colors! I love traditional blocks with a twist (hey, that's actually a published book title, by the way!), and yet you made it so easy!
ReplyDeleteThanks for a chance to win!
nice pillow. thank you for the giveaway!
ReplyDeletejjsell76 at yahoo dot com
Super cute and love the tip to work in quarters, trim and then put the quarters together. Thanks for the tutorial!
ReplyDeleteVery cute. Great tips!
ReplyDeleteAh! This is so cute with the flea market fancy. Great tutorial! I'd love to craft one up just like it :-) I know my LQS would love for me to go crazy on the fabric, too ;-)
ReplyDeleteThank you so much for a clear tutorial and lots of tips to make it go smoothly...really love how it turned out! This is an inspiring project. Thanks for the chance to win!
ReplyDeleteLove that pillow!
ReplyDeleteI have been wanting to make a pillow for my couch and wasn't sure of what I would do. I have been interested in Dresden designs and this is inspiring! I'd love to win the ruler.
ReplyDeleteMichelle
I have been wanting to make a pillow for my couch and wasn't sure of what I would do. I have been interested in Dresden designs and this is inspiring! I'd love to win the ruler.
ReplyDeleteMichelle
You have certainly given me a project to try. Yours is beautiful! Thanks for the opportunity to win.
ReplyDeleteLove the fabric choices, will have to look for the Flea Market!
ReplyDeleteThanks for the tut, very inspiring!
Thank you for the tutorial!!! I love your background fabric choice. It makes the pink and grey really pop! Thk you for participating in the hop! It's been really fun seeing all the ideas everyone has and is sharing!
ReplyDeleteVery cute pillow! Thanks for the tutorial and giveaway!
ReplyDeleteYour dresden pillow is gorgeous & a completely worthy use of FMF! Thanks for the great tutorial & for the chance to win one of these fab rulers.
ReplyDeleteWhat a beautiful pillow! Thanks for a chance to win this great ruler! :)
ReplyDeleteStrip piecing is such a great way to make these dresdens - love the pillow!
ReplyDeleteI love the idea of strip piecing the dresdens so much that I am giving it a go right now. My question is; as I am following the tutorial my six 1 1/2 in strips equal 6 1/4. What have I done wrong? Pathetic I know. Help?
ReplyDeleteYours is beautiful!!!!
Cindy
Stan_yam@msn.com
Jessica, this is gorgeous!
ReplyDeleteJust amazed with ez dresden challenge you revealed in this post. I was excited seeing so many photos you inserted step by step for making a strip pieced dresden pillow. This was incredibly a beautiful designing project of course. My aspiration was to explore the pillowcase for body pillows design ideas, but love to agree this was an incomparable discovery after entering your quilting world. Love it simply.
ReplyDeleteYes i am totally agreed with this article and i just want say that this article is very nice and very informative article.I will make sure to be reading your blog more. You made a good point but I can't help but wonder, what about the other side? !!!!!!THANKS!!!!!!
ReplyDeleteFitted Sheet