
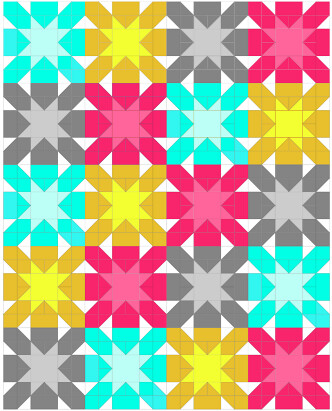
I am so so super excited that although I am not able to go to Quilt Market this year, one of my quilts will be going! Last week I was asked if I would be willing to make a last minute quilt to go to market, and of course I had to say yes. The next day the Fed Ex man brought me this beautiful stack of Melissa White fabrics, which admittedly aren't usually what I am drawn to when shopping for fabrics, but in person they are just beautiful. They sort of remind me vintage sheets meet Kaffe Fassett, and are oh so soft, almost silky. I thought this would be the perfect project to use my most recent TouchDraw quilt design , and thought I'd share a quick tute with you all today.
Starburst Cross Block
12.5" unfinished block

For this block, you will need two prints: Fabric A (center star) and Fabric B ("cross" fabric) and a neutral background fabric, I used white.
STARBURST CROSS BLOCK TUTORIAL
Updated (3/6/2014) block tutorial with simplified cutting and piecing instructions after appearing in October/November QUILT Magazine
12.5” unfinished block
MATERIALS:
(1) 4.5” square Fabric A
(8) 2.5” squares Fabric A
(8) 4.5” squares Fabric B
(8) 2.5” squares Solid/Background Fabric
INSTRUCTIONS:
Use a scant 1/4” seam allowance unless otherwise noted.
1. Draw a diagonal line from opposite corners on all (8) 2.5” print squares and (8) 2.5” solid/background fabrics.
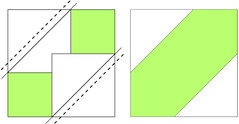
2. To construct the (4) corner units, align (2) marked white squares on opposite corners of (1) 4.5” Fabric B square, right sides together, as shown below, and sew on the marked line. These will form your corner units or “rays.”

3. Repeat step 2 with (3) additional 4.5” Fabric B squares and remaining (6) 2.5” Solid/Background Fabrics.
4. Using your rotary cutter, trim all (4) corner units 1/4” away from each stitched line (the dotted line as pictured below) and press towards your solid/background fabric.
5. To construct the side units, align (1) 2.5” Fabric A square on the corner of (1) 4.5” Fabric B square and use the process described above to stitch, trim and press. Next, align a second 2.5” Fabric A square on an adjacent corner, stitch, trim and press, as shown below.
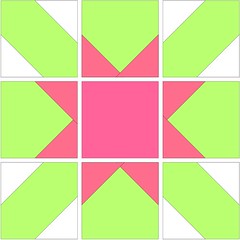
6. To complete your block, arrange the (4) corner units or “rays”, (4) side units and (1) Fabric A 4.5” square in (3) rows of (3) units as shown below. Sew the (3) rows together to complete the block.
STARBURST CROSS BLOCK TUTORIAL
Updated (3/6/2014) block tutorial with simplified cutting and piecing instructions after appearing in October/November QUILT Magazine
12.5” unfinished block
MATERIALS:
(1) 4.5” square Fabric A
(8) 2.5” squares Fabric A
(8) 4.5” squares Fabric B
(8) 2.5” squares Solid/Background Fabric
INSTRUCTIONS:
Use a scant 1/4” seam allowance unless otherwise noted.
1. Draw a diagonal line from opposite corners on all (8) 2.5” print squares and (8) 2.5” solid/background fabrics.

2. To construct the (4) corner units, align (2) marked white squares on opposite corners of (1) 4.5” Fabric B square, right sides together, as shown below, and sew on the marked line. These will form your corner units or “rays.”
3. Repeat step 2 with (3) additional 4.5” Fabric B squares and remaining (6) 2.5” Solid/Background Fabrics.
4. Using your rotary cutter, trim all (4) corner units 1/4” away from each stitched line (the dotted line as pictured below) and press towards your solid/background fabric.
5. To construct the side units, align (1) 2.5” Fabric A square on the corner of (1) 4.5” Fabric B square and use the process described above to stitch, trim and press. Next, align a second 2.5” Fabric A square on an adjacent corner, stitch, trim and press, as shown below.

6. To complete your block, arrange the (4) corner units or “rays”, (4) side units and (1) Fabric A 4.5” square in (3) rows of (3) units as shown below. Sew the (3) rows together to complete the block.
What a fun block! I'll have to give it a try :)
ReplyDeleteOh.... It's a stunning block. Definitely on my want-to-do list. Thank you mush for the tutorial
ReplyDeleteCool, thanks for the tute :o)
ReplyDeletegreat block
ReplyDeletewow - love this block! thanks for the tute!
ReplyDeleteGreat block! I love the colorful fabrics, too!
ReplyDeleteI love this. Thanks for the flying Geese how to. It seems so easy. Also I love the color combo of this block. Awsome
ReplyDeleteThat's going to look really cool!
ReplyDeleteOh yay, you're doing the quilt for Market! I gave the Windham lady your name but I didn't know if she ended up contacting you. Very cool design! I'm headed to market so I'll look for your quilt and get a picture of it! : )
ReplyDeleteWOW, Jessica! How awesome to have a quilt at Quilt Market!!! And it's a great tutorial. (I really love the mockup colors, too!)
ReplyDeleteLove your block design - congrats on having a quilt at market too!
ReplyDeletelove that block. I made flying geese the same way on another block I just made. I like that technique.
ReplyDeleteThis is an amazing tutorial! I have never made a quilt block and was able to make this one in an hour today! And major congrats on having a quilt in the Quilt Market!!
ReplyDeleteI love this block so much. Thank you!
ReplyDeleteLove this block, can't wait for a full quilt tute for yardage requirements - not my forte!
ReplyDeleteFinished this lovely quilt by taking all the corner clippings, making tons of 3-1/2" pinwheels and using them for a border. I also made the whole thing bigger to fit on a queen bed. Super easy to figure out. Thank you for,sharing.
ReplyDeleteStunning quilt - great block - love the colours too��
ReplyDeleteOh yay, you're doing the quilt for Market! I gave the Windham lady your name but I didn't know if she ended up contacting you. Very cool design! I'm headed to market so I'll look for your quilt and get a picture of it! gold bracelet wholesale uk , mens wedding rings canada
ReplyDeletePlease help! I'm looking for Blackbird designs Garden Party quilt pattern. Was it published in one of their books? It's a dresden plate variation but has two triangles (not hst's) at the inner points of each quarter block. If anyone can help me find it, I sure would appreciate it!
ReplyDelete