
I've had a few questions about the pattern I used to make my plus quilt top I shared last week, and while the design idea is certainly not unique to my quilt, I didn't follow a pattern per se, but did my own quilty math for the plus size dimensions I wanted. In case you'd like to make your own baby/lap sized plus quilt, I thought I'd share a quick tutorial with cutting and assembly instructions.
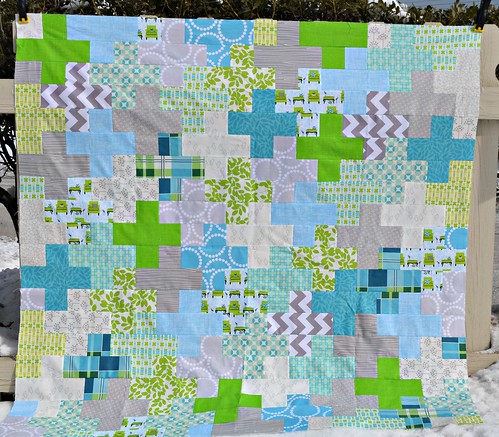
This quilt top will finish at 50" square, making a generous baby quilt or lap sized throw. I chose to keep the rectangular centers of each plus as one piece, versus the entire quilt being comprised of only squares.
Plus Quilt Tutorial
Please read instructions in full before beginning.
Fabric Requirements
(12) Fat Quarters measuring no less than 18" x 22"
3 yards backing fabric
1/2 yard fabric for binding
Cutting Instructions
From each of (12) fat quarters:


7 total
Consists of (1) 8" x 3" strip and (1) 3" x 3" square
7 total
Consists of (1) 5.5" x 3" strip and (2) 3" x 3" squares

1 total
Consists of (1) 5.5" strip and 1" 3" x 3" square
single 3" square: 16 total
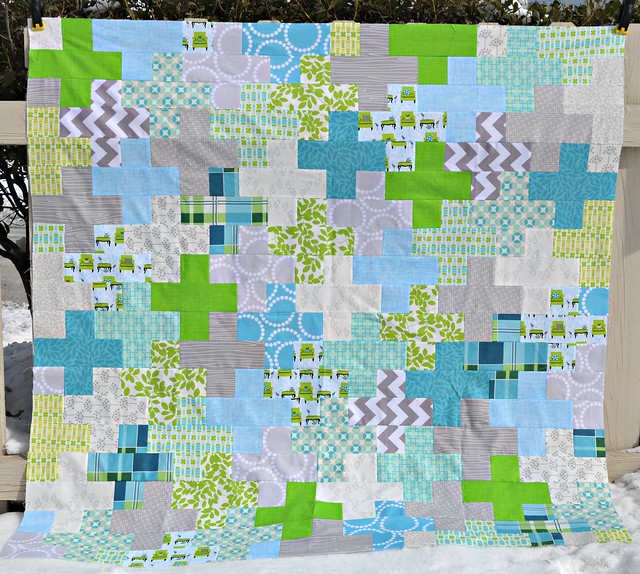
Use the above photo to help layout your quilt top. Once you are happy with the layout, begin sewing each row together, taking care to keep all strips and squares in the correct position. I find it helpful to sew one complete row and place it back on my design wall to keep things from getting out of place. If you do not have a design wall or somewhere to keep things laid out for a few days while assembling, use post its to number each row to help keep things in order.
(12) Fat Quarters measuring no less than 18" x 22"
3 yards backing fabric
1/2 yard fabric for binding
Cutting Instructions
From each of (12) fat quarters:
- Cut (5) 3" x 18" strips
- Subcut (3) of the 3" x 18" strips into (2) 8" x 3" strips
- You will need all (72) 8" x 3" strips
- Subcut (2) of the 3" x 18" strips into (6) 3" x 3" squares
- You will need all (144) 3" x 3" squares
- Cut (1) 3" x 18" strip
- Subcut 3" x 18" strip into (1) 5.5" x 3" strip and (3) 3" x 3" squares
- You will need all (8) 5.5" x 3" strips
- You will need all (24) 3" x 3" squares
Assembly Instructions
Once your fabric is cut, you can begin laying out your quilt top. The majority of your quilt top will consist of whole pluses consisting of (1) 8" x 3" strip and (2) 3" x 3" squares. There are also variations which are included along the edges of the quilt. Please see below for a breakdown totaling the number of each plus variation.
65 total
Consists of (1) 8" x 3" strip and (2) 3" x 3" squares
7 total
Consists of (1) 8" x 3" strip and (1) 3" x 3" square
7 total
Consists of (1) 5.5" x 3" strip and (2) 3" x 3" squares
1 total
Consists of (1) 5.5" strip and 1" 3" x 3" square
single 3" square: 16 total
Use the above photo to help layout your quilt top. Once you are happy with the layout, begin sewing each row together, taking care to keep all strips and squares in the correct position. I find it helpful to sew one complete row and place it back on my design wall to keep things from getting out of place. If you do not have a design wall or somewhere to keep things laid out for a few days while assembling, use post its to number each row to help keep things in order.
Hope this tutorial was helpful! If you make a plus quilt using this tutorial, I'd love to see it in the SewCraftyJess flickr group!
Thank you for posting this tutorial! I love this quilt!!
ReplyDeleteLove it...thank you for sharing!
ReplyDeleteSo pretty and thanks for the tutorial!
ReplyDeleteI've been admiring this pattern for a while, but couldn't seem to understand how it was done. Thank you so much for the tutorial.
ReplyDeleteThanks so much for sharing how u did it! You didn't have to but that was so nice!
ReplyDeleteThank you for posting this tutorial! Love the pattern.
ReplyDeleteThank you so much! I have always loved this pattern and your tut is great. I appreciate you sharing with all of us.
ReplyDeleteI love this pattern. Thank you for posting. I have a question though: you say to use 12 fat quarters, but I'm counting 17 different prints in your quilt. Is there something I'm missing?
ReplyDelete