
As promised, here is a review of the 3" half square triangle die which works in conjunction with either the Accuquilt GO! or GO! Baby, and little tutorial for putting together some zig zag pillows. I have to say, after having taken the time to scour youtube for video tutorials to improve my GO! Baby cutting experience, I have been nothing but impressed with this cutter. You can read more about my experience with the hexagon die here.
In all honesty, I do not think it is practical to expect to solely use this cutter for all your fabric cutting needs, but I do find it very useful for cutting fabrics for smaller projects, or cutting things that are generally a pain to cut (i.e. curves, hexagons, circles). Especially for the latter, as it quickly yields very precise cuts which are uniform with each run through the cutter.
Now onto the good stuff, here's what you'll need to make this pillow:
Approximately a fat eight of 7 different fabrics
Accuquilt GO! or GO! Baby
3" finished Half Square Triangle Die
6" x 12" GO! Cutting Mat
6 scrap pieces of printer paper measuring appx 6" x 12"
piece of batting measuring at least 19" x 19"
scrap piece of fabric for "quilt back" of pillow top measuring at least 20" x 20"
(2) pieces of fabric measuring 19" x 13.5" for the envelope back closure
pillow form measuring 18"-20" square
rotary cutter
quilting ruler
Instructions:
Before we get started, we need to figure out the arrangement of your fabrics so we know what fabrics to sew together to form the HST zig zag pattern.

This pillow will consist of 6 rows of 6 HSTs (total of 36 HSTs).
For Row 1, you will make 6 HSTs pairing fabrics 1 and 2 (in my case the brown and yellow dots)
Row 2: 6 HSTs pairing fabrics 2 and 3 (in my case the yellow dots and green paisleyish fabrics)
Row 3: 6 HSTs pairing fabrics 3 and 4 (green paisleyish and dark blue)
Row 4: 6 HSTS pairing fabrics 4 and 5 (dark blue and yellow)
Row 5: 6 HSTs pairing fabrics 5 and 6 (yellow and green flowers)
Row 6: 6 HSTs pairing fabrics 6 and 7 (green flowers and blue dots)
Now that we have our fabric arrangement, mark the blades with a sharpie marker on your GO! die.

Starting with the fabrics needed for row 1, lay a piece of fabric 1 big enough to cover both sets of HSTs on the die right side up. Then lay a piece of fabric 2 covering the die right side down (your 2 pieces of fabric should be right sides facing). Repeat so you have 4 pieces of fabric layered on the cutter.
When layering your fabric, make sure you are feeding the lengthwise grain (grain with the least amount of stretch) through the cutter. If you are unsure of how to tell lengthwise from crosswise grain, here is a good video explaining how to tell them apart.

Layer a piece of your scrap paper covering the fabric.

Layer your cutting mat ontop of your scrap paper and roll through the cutter.
Peel off your layer of cut scrap paper and this is what you should have. Accuquilt says it is ok to run paper through your cutter, and it should not damage or wear down the blades. I find that by using the paper it keeps the fabric from stretching and yields very accurate cuts. Especially on the square dies, I had lots of problems with fabric stretching until I layered a piece of paper and it solved the problem.

8 perfectly paired sets of triangles (already right sides facing) ready to chain piece together into HSTs! (You will only be using 6 of these HSTs, so there are 2 extra)

Select two triangles that are right sides facing and begin chain piecing your HSTs together. The corners are clipped at a perfect 1/4 inch seam. Begin sewing your HSTs together beginning at the left side of the clipped corner. Sew all 6 together and press the seams open.

This is whats great about this die. Because the corners are pre-clipped, and the fact that you ran your fabric through the cutter right sides together and kept your paired fabrics aligned, you should have a perfect 3 1/2" unfinished HST that does not need trimmed!


Repeat this process for the remaining 5 rows of HSTs.
Align on your design wall as desired, sew your completed HSTs together into rows of 6, and then sew your rows together, aligning your seams using a 1/4" inseam.
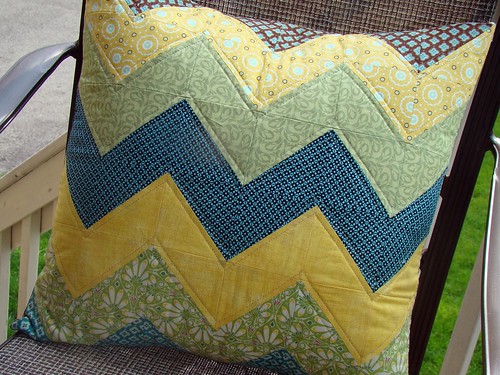
This is what the result should look like, and should measure 18 1/2" square.
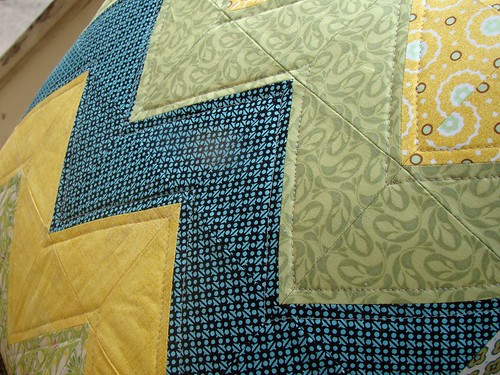
Make your quilt sandwich by layering your fabric for the pillow top back right side down, batting, and zig zag pillow top right side up. Baste and quilt as desired. I echo quilted 1/4 inch on either side of the zig zag lines. Nice clean and simple.

Take one of your envelope back pieces and fold one of the 19" edges toward the wrong side 1/2". Press.

Fold the same edge over again 1/2" to conceal the raw edge and press. Pin into place if you'd like.

Edge stitch on the wrong side of your fabric to hold your pressed seam into place. (I use matching thread so that it blends with my envelope back and my stitches are unnoticeable).

Repeat with your second piece of 19" x 13.5" piece of fabric for the envelope back.
For the next step, lay your pillow top right side up, and arrange your envelope back right sides down ontop of your pillow top. Your evelope back should be large enough to overlap your pillow front by appx 1/4" on all sides. Place a few pins to hold your pillow back and front together.

Turn your pinned pillow over and continue pinning, I used about 4 pins per side to hold the pillow front and back together. Pay careful attention to where your ends for your envelope back are. You should see appx 1/4" of the pillow back peeking out from underneath your pillow top.

Stitch pillow top and envelope back together using 1/4" inseam around all 4 sides. I like to backstitch at the edges of your finished envelope seams to reinforce.
Once your pillow is sewn together, trim off the excess envelope back fabric using a straight edge (quilting ruler) and rotary cutter.

Clip all 4 corners.

Turn your pillow cover right side through the envelope back closure. I like to give my completed cover one good press before inserting my pillow form.

Insert an 18"-20" pillow form (I used a 20" pillow and have a nice snug fit) and enjoy!
What a great tutorial! Thank you!
ReplyDeleteLovely pillow! I want to play with a Go! cutter too! :)
ReplyDeleteGreat tutorial, I might have to buy that die the next time I have funds :)
ReplyDeleteI'm seeing pillows in my future... These are Lovely. (Of course, I'll be cutting HSTs the old fashioned way...)
ReplyDeletePaul
www.OutnumberedQuilter.com
Thanks for the tutorial. If I didn't have so much going on here I could cut me some triangles!
ReplyDeleteGreat tutorial and like Paul I'll be cutting HSTs the old fashioned way.
ReplyDeleteCheers,
Robyn
I like the colors .. good tutorial. thanks for sharing
ReplyDeleteHi Jess! I love this tutorial. May I have your permission to feature it (any maybe some of your other tutorials) on www.sewcanshe.com? Please drop me a line. caroline@sewcanshe.com
ReplyDeleteThanks!
Caroline
As promised, here is a review of the 3" half square triangle die which works in conjunction with either the Accuquilt GO! or GO! Baby, and little ... trianglepillow.blogspot.com
ReplyDelete