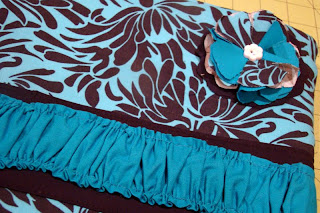
I have to admit, with the temperatures in these parts in the upper 90s all week, and heat index in the 100s (for Pittsburgh, this is crazy!) I've not been in all that much of a sewing mood lately. I'd say the only thing getting me sewing, is that my sewing room is in the basement, and its a solid 10 degrees cooler down there, even the dogs venture down to hang out with me!
A co-worker of my mom's contact me about making a commissioned laptop case for her. Now, I've never specifically made a laptop case, but thought I could surely figure out a way.
I scoured my favorite crafty blogs for some free tutorials, and ended up with a mish mosh of a few tutorials to end with something I liked. The rouching design came from Crap I've Made, but I wasn't crazy about how the tutorial installed the zipper. So I continued searching, and found this tutorial which was more the shape I wanted.
So I went to town, following the rouching instructions from tutorial #1, and the dimensions suggestions from tutorial #2, and altered the zipper to add zipper tabs (like I did with these, following Kelly's tutorial), got things all finished, aaaaannnndddd it was too small! Argh. Really?? Now luckily I had a ton of this Amy Butler Daisy Chain fabric so I make a second, with a much better result.
I thought in case you ever had a desire to make a zippered laptop sleeve like this, I'd share a few tidbits of how I made mine (and to ensure it will fit your laptop!)
First, I used what seemed like a crazy insane amount of padding! After cutting the proper outer fabric and lining fabric, I applied fusible fleece to all 4 fabrics (2 outer, 2 inner) I cut the fleece about an inch smaller than my fabric, so I didn't have overly bulky seams. I then cut 4 pieces of quilt batting about 1/2 inch smaller than my fabric (just so that it would catch in the finished seams (I used spray baste to temporarily hold the batting in place). Again, while this seems like alot (and it is!) it's a quite nice thickness and provides some protection when all is said and done.
length of your laptop + height of laptop (how high it sits off the ground) + 1.5 inches.
In my case, my laptop I was making this for was 15" and 1.25" high + 1.5"= 17.75" (I just rounded up to 18")
Now add 1.5" to how long your zipper is, and that is how wide you need to cut your fabric (19.5" in my case, again rounded up to 20" and it was quite roomy).
To figure out the length, I added 4" to the length for the outer fabric, and 3.5" to the lining fabric (to avoid bulky seams). My outer fabric was cut at 19.5" x 14" and the lining 19.5" x 13.5"
Whew! Thats enough math for one day, I should think. I think I need to make one of these for myself soon, so I'll snap some pics of the process if theres an interest.
Hopefully this laptop sleeve is well received, I know I like it!


How lovely...I like how you used that Amy Butler fabric too! Thanks for the helpful hints...I actually carry my laptop in a bag...cause I need handles...but your sleeve is just super cute!
ReplyDeleteBeautiful.. something like this has been on my to-do list forever! It will prob stay there a while yet but I can always come back and read your tips again. Thanks :)
ReplyDeleteI've seen this one! I've done Oh Fransson's version over at Sew Mama Sew but I love how this one looks as well! Glad to see if all worked out!
ReplyDeleteCute! Great job. :) I think my favorite thing is finding a bunch of different versions of patterns and then mixing them all together and changing a few things here and there to make it my own. :) I think I need one of these as well.
ReplyDeleteOf course you are always one step ahead of me! I have a cover on my list for my DD. Now I know I was on the right track in my design, because I see yours! Thanks! Love the fabric!
ReplyDeleteWhat a lovely gift.
ReplyDeleteLol, glad I'm not alone in the need to 'redesign' patterns from bits of others and ending up with an unintentional 'trial' run! Love the colours and that ruching looks wonderful, as does the removable flower!
ReplyDeleteCheers,
Robyn
Oh this is lovely - I like to pull up a few tutorials and mix the best bits of them too!!
ReplyDelete